
A while back I needed to deploy the NSX Application Platform (NAPP) in my lab environment to demonstrate features like NSX Intelligence and the ones within NSX Advanced Threat Prevention (ATP).
In my experience, deploying NAPP can be more or less of an undertaking depending largely on whether the prerequisites are in place and the requirements are met. Thoroughly reading through the documentation as well as some level of comfort working with Kubernetes do come in handy too.
Today’s article is not so much a guide on how to install the NSX Application Platform as it is my own documentation on deploying NAPP in my specific lab environment. My documentation might help you with your NAPP deployment as well (I hope it does), but it will not include much information on the “whys” and the “hows” and instead focus on getting the job done.
Lab Overview
The lab environment for this NAPP deployment consists of the following VMware components:
- vCenter 8.0 Update 1c
- ESXi 8.0 Update 1c
- NSX 4.1.1.0
The goal is to install the Evaluation Form Factor of NAPP using just one VLAN. As a result of that I ended up with the following configuration:
- Kubernetes v1.24.16 (latest version supported by NAPP 4.1.1 as of this writing)
- Ubuntu 22.04 (node OS)
- 1 x Control node (VM)
- 1 x Worker node (VM)
- Antrea CNI
- MetalLB (Kubernetes load-balancer)
- vSphere Container Storage Plug-in

Install & Configure Kubernetes
Installing Kubernetes on Ubuntu 22.04 involves relatively many steps (when not automated) but is rather straightforward and well documented. In my case I deployed two Ubuntu virtual machines with the following specifications:
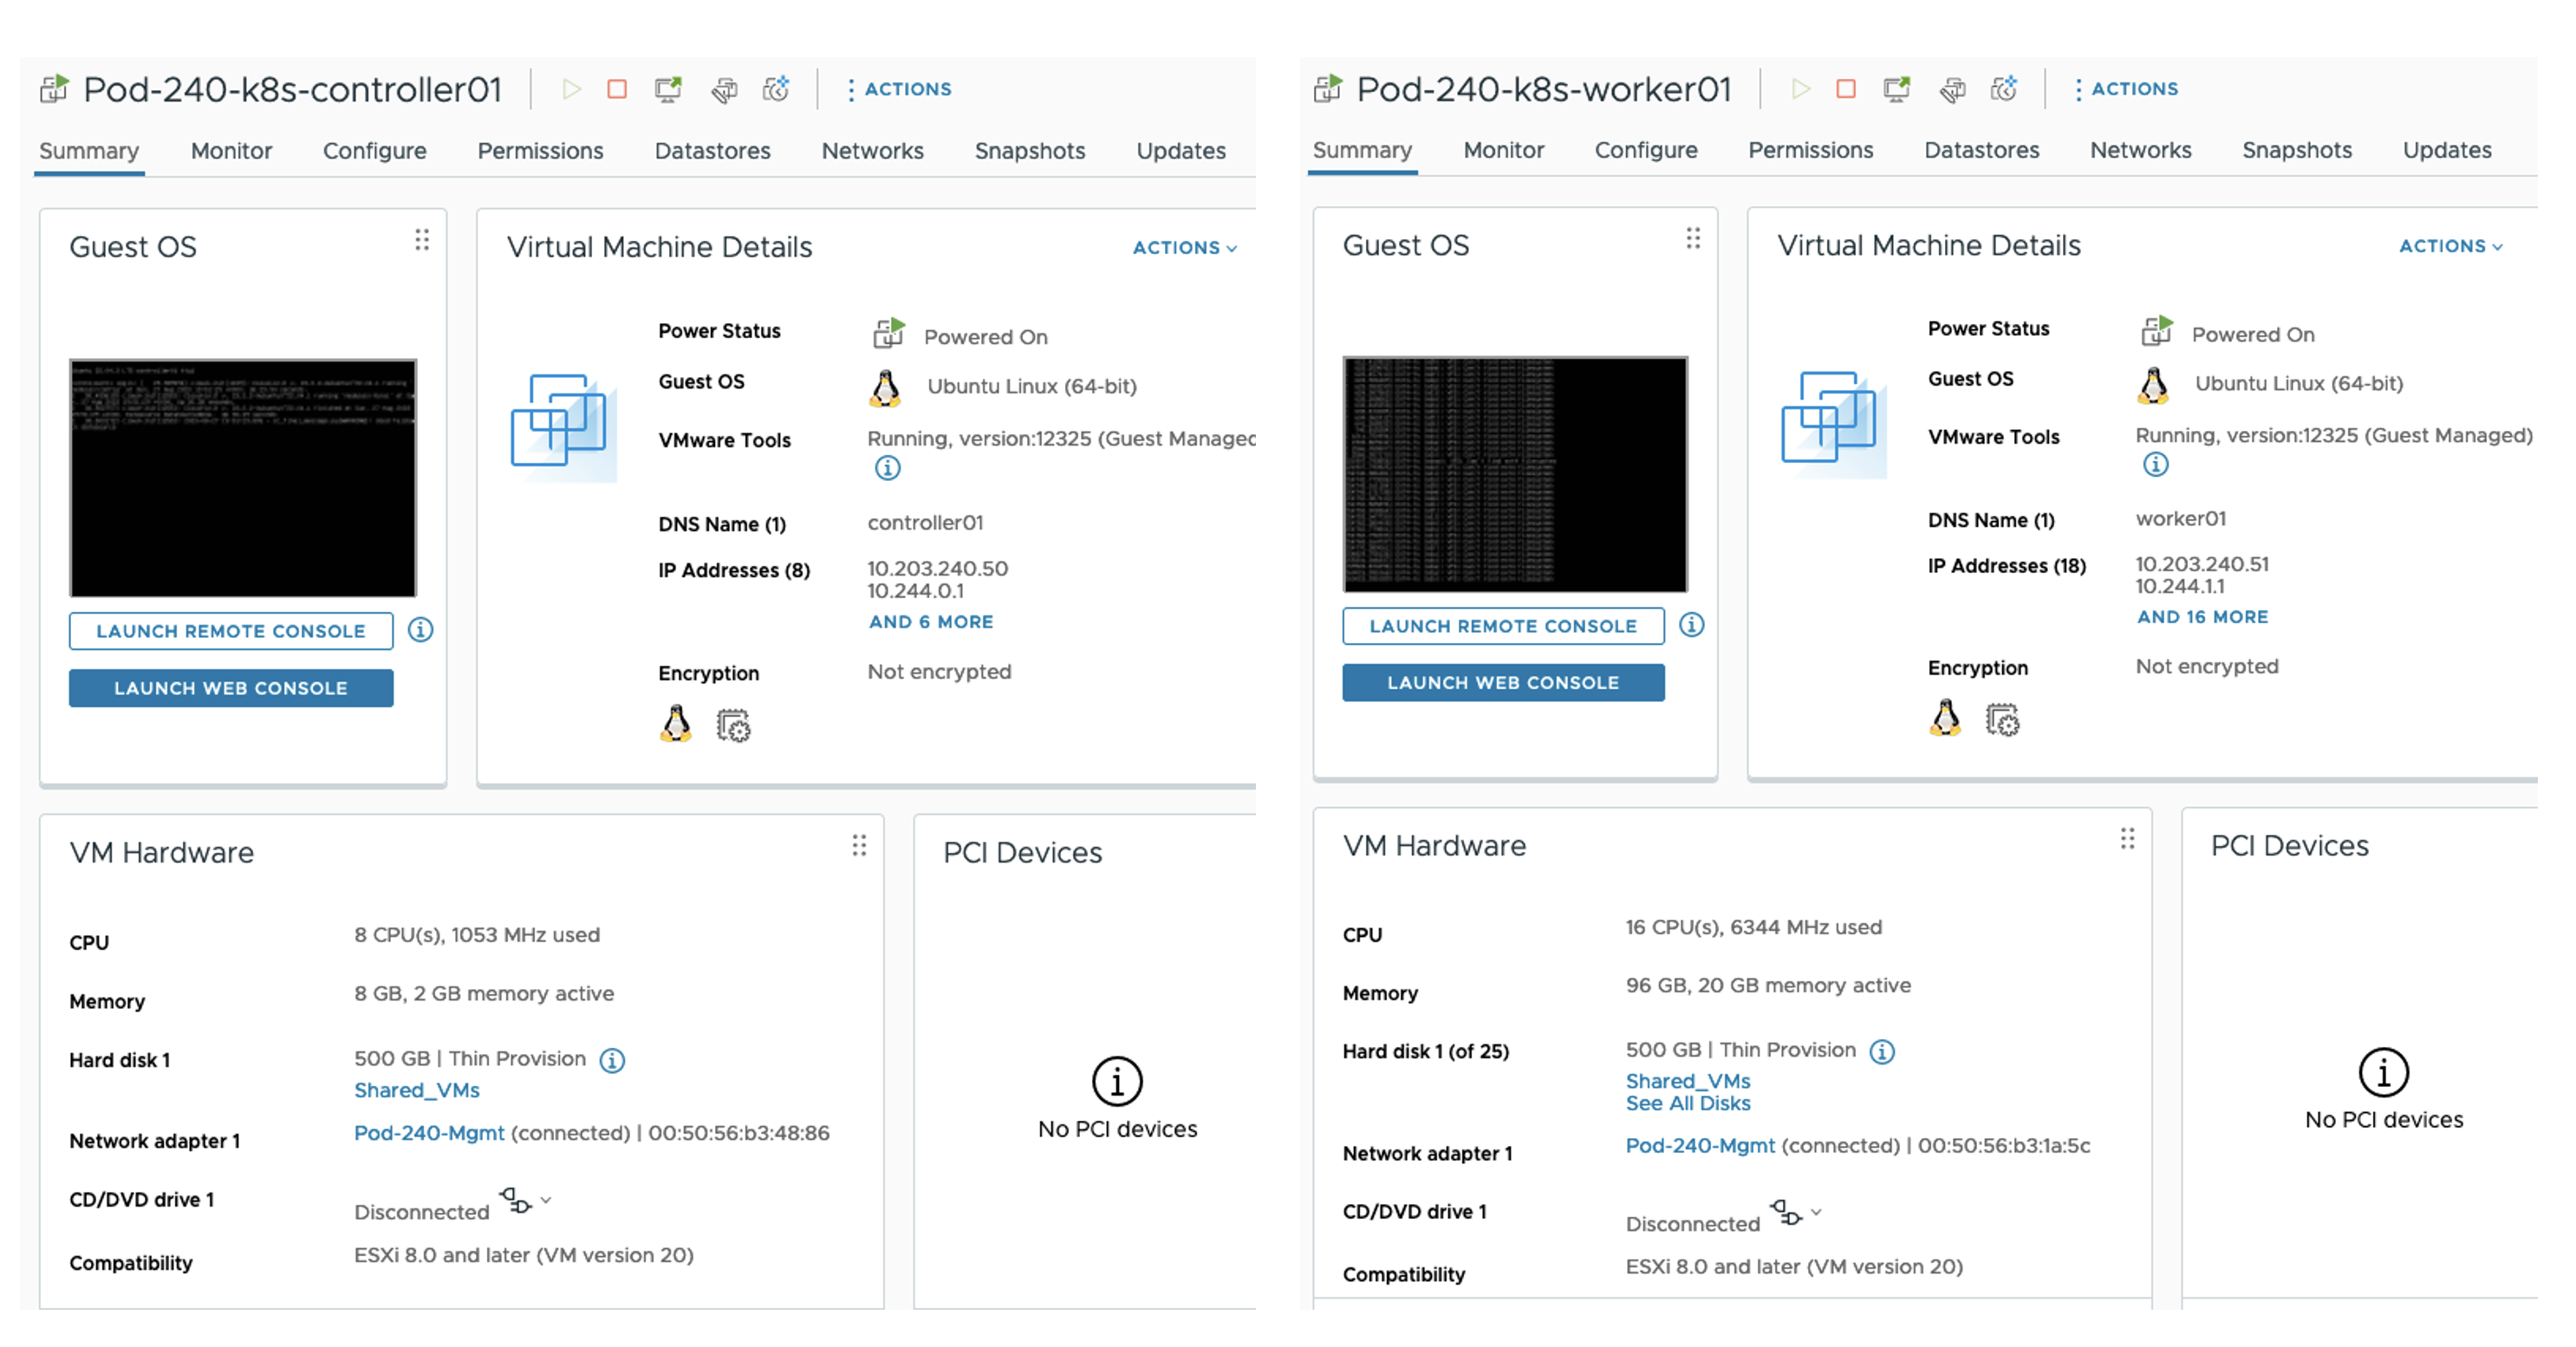
Control Node (controller01)
- 8 vCPU
- 8 GB RAM
- 1 x 500 GB disk
- 1 x NIC connected to Management VLAN
- FQDN: controller01.sddc.lab
- IP address: 10.203.240.50/24
Worker Node (worker01)
- 16 vCPU
- 96 GB RAM
- 1 x 500 GB disk
- 1 x NIC connected to Management VLAN
- FQDN: worker01.sddc.lab
- IP address: 10.203.240.51/24
It’s important that the nodes can resolve their own and each other’s FQDNs. Preferably by creating DNS records.
After the Ubuntu base OS installation we are ready to install and configure the Kubernetes cluster. Run the following commands on both nodes:
sudo apt update && sudo apt upgrade

sudo apt-get install -y apt-transport-https ca-certificates curl gnupg lsb-release

curl -s https://packages.cloud.google.com/apt/doc/apt-key.gpg | sudo apt-key add

echo "deb https://apt.kubernetes.io/ kubernetes-xenial main">> ~/kubernetes.list
sudo mv ~/kubernetes.list /etc/apt/sources.list.d
sudo apt update

export VERSION="1.24.16-00"
sudo apt-get install -y kubelet=$VERSION kubeadm=$VERSION kubectl=$VERSION
sudo apt-mark hold kubelet kubeadm kubectl

cat<<EOF | sudo tee /etc/modules-load.d/k8s.conf
overlay
br_netfilter
EOF

sudo modprobe overlay
sudo modprobe br_netfilter

sudo tee /etc/sysctl.d/kubernetes.conf<<EOF
net.bridge.bridge-nf-call-ip6tables = 1
net.bridge.bridge-nf-call-iptables = 1
net.ipv4.ip_forward = 1
EOF

sudo sysctl --system

sudo mkdir -p /etc/apt/keyrings
curl -fsSL https://download.docker.com/linux/ubuntu/gpg | sudo gpg --dearmor -o /etc/apt/keyrings/docker.gpg

echo \
"deb [arch=$(dpkg --print-architecture) signed-by=/etc/apt/keyrings/docker.gpg] https://download.docker.com/linux/ubuntu $(lsb_release -cs) stable"| sudo tee /etc/apt/sources.list.d/docker.list > /dev/null

sudo apt update
sudo apt install containerd.io -y
containerd config default | sudo tee /etc/containerd/config.toml >/dev/null 2>&1
sudo sed -i 's/SystemdCgroup \= false/SystemdCgroup \= true/g' /etc/containerd/config.toml

sudo systemctl enable containerd
sudo systemctl start containerd

sudo sed -ri '/\sswap\s/s/^#?/#/' /etc/fstab
sudo swapoff -a

sudo systemctl enable kubelet
sudo systemctl start kubelet
Run the following commands on the Control node:
sudo kubeadm init --control-plane-endpoint=controller01.sddc.lab --pod-network-cidr=10.244.0.0/16

mkdir -p $HOME/.kube
sudo cp -i /etc/kubernetes/admin.conf $HOME/.kube/config
sudo chown $(id -u):$(id -g) $HOME/.kube/config

kubeadm token create --print-join-command
It’s important to add the --pod-network-cidr to the kubeadm init command as this will enable NodeIpamController in Antrea which we’ll install in a moment.
Copy the output of the last command and run it on the Worker node. For example:
kubeadm join controller01.sddc.lab:6443 --token wo64hi.83y9s2jh9p3dt7m9 --discovery-token-ca-cert-hash sha256:4218627e8cf43588a0d1e849529cb144a718a8f2ffdd3e3fd0d1caa01d5afd84Install Antrea
Next we need to install a CNI. In my lab this is Antrea. Run the following command on the Control node:
kubectl apply -f https://raw.githubusercontent.com/antrea-io/antrea/main/build/yamls/antrea.ymlWith Antrea installed and running we should have a working Kubernetes cluster. From the Control node run:
kubectl get nodes -o wide
The nodes report the Ready status. This completes the installation of the Antrea CNI.
Install & Configure MetalLB
In this lab MetalLB will be responsible for load-balancing. Install the MetalLB Kubernetes load-balancer by running the following command on the Control node:
kubectl apply -f https://raw.githubusercontent.com/metallb/metallb/v0.13.10/config/manifests/metallb-native.yamlNext, we need to create an IPAddressPool that MetalLB uses when assigning IP addresses to services. Create a file called mbpool.yaml with the following contents:
apiVersion: metallb.io/v1beta1
kind: IPAddressPool
metadata:
  name: napp-pool
  namespace: metallb-system
spec:
  addresses:
  - 10.203.240.60-10.203.240.70
Create the IPAddressPool in Kubernetes from the Control node:
kubectl apply -f mbpool.yaml An L2Advertisement is needed as well. Create a file called l2adv.yaml with the following contents:
apiVersion: metallb.io/v1beta1
kind: L2Advertisement
metadata:
  name: napp-pool
  namespace: metallb-system
Create the L2Advertisement in Kubernetes from the Control node:
kubectl apply -f l2adv.yaml This completes the installation and configuration of the MetalLB Kubernetes load-balancer .
Install & Configure vSphere Container Storage Plug-in
In order to provide the required storage to the different NAPP Kubernetes Pods we install and configure the vSphere Container Storage Plug-in.
First we create the required Kubernetes namespace by running the following from the Control node:
kubectl apply -f https://raw.githubusercontent.com/kubernetes-sigs/vsphere-csi-driver/v3.0.0/manifests/vanilla/namespace.yamlNext we create a configuration file that we’ll use when creating the Kubernetes Secret in a moment. The contents of my csi-vsphere.conf:
[VirtualCenter "netlab-vcenter.netlab.home"]
insecure-flag = "true"
user = "Administrator@vsphere.local"
password = "VMware1!"
port = "443"
datacenters = "SDDC"
Now we create the Kubernetes Secret from the Control node:
kubectl create secret generic vsphere-config-secret --from-file=csi-vsphere.conf --namespace=vmware-system-csiInstall the plug-in from the Control node:
kubectl apply -f https://raw.githubusercontent.com/kubernetes-sigs/vsphere-csi-driver/v3.0.0/manifests/vanilla/vsphere-csi-driver.yamlAs we’re running a single control plane node (controller01) we should make the following adjustments to the CSI deployment. From the Control node:
kubectl edit deployment vsphere-csi-controller -n vmware-system-csiWe adjust the number of replicas to be just 1:
kind: Deployment
apiVersion: apps/v1
metadata:
  name: vsphere-csi-controller
  namespace: vmware-system-csi
spec:
  replicas: 1
The last step is to create a StorageClass which makes vSphere storage available to the Kubernetes Pods. First we define a new Storage Policy in vCenter:

Give it a name and enable host based rules (my vSphere environment uses VMFS-backed storage):
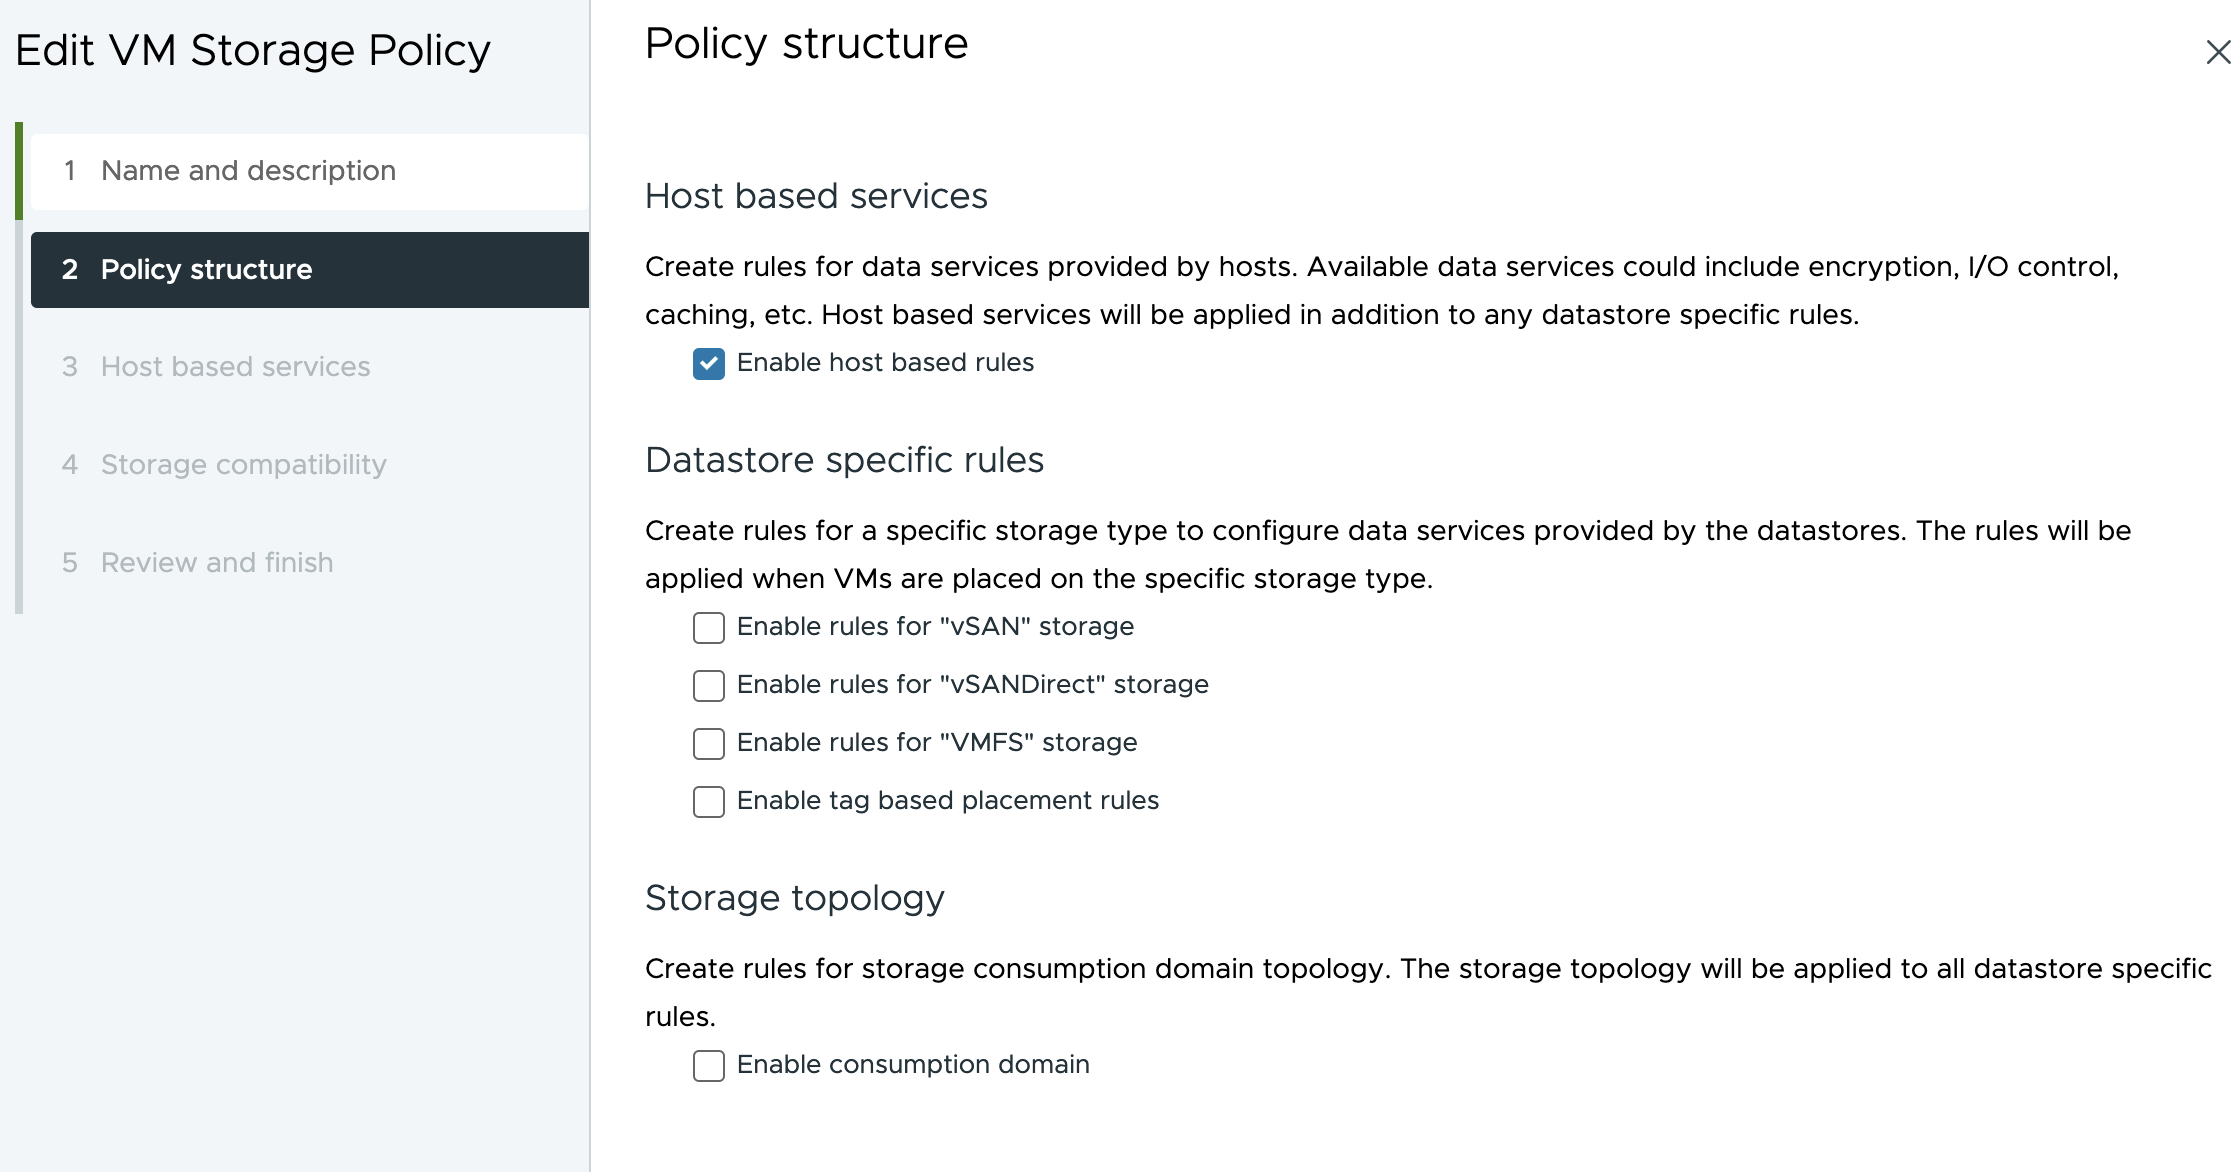
To be able to create this policy at all we must define a host based service. Keeping it simple I define a Storage I/O Control service with Normal IO shares allocation:

With the “k8s” vSphere Storage Policy in place we can continue with creation of a matching StorageClass in Kubernetes. On the Control node create a file called sc.yaml with the following contents:
kind: StorageClass
apiVersion: storage.k8s.io/v1
metadata:
  name: vsphere-csi-storageclass
  annotations:
    storageclass.kubernetes.io/is-default-class: "true"
provisioner: csi.vsphere.vmware.com
parameters:
  storagepolicyname: "k8s"
Now we can create the StorageClass using this file from the Control node:
kubectl apply -f sc.yamlThis completes the installation and configuration of the vSphere Container Storage Plug-in.
Register DNS Records For NSX Application Platform
We need to register two DNS records for NAPP to function properly; one for the NAPP Interface Service Name and one for the NAPP Messaging Service Name. The IP addresses for these records are taken from the Kubernetes IPAddressPool that we created earlier.
The IP address claimed for the NAPP Interface Service Name is always the first available IP address in the defined IPAddressPool. In my case this is 10.203.240.60. For NAPP Messaging Service Name it can be any other available IP address from the IPAddressPool. The NAPP deployment will figure that one out by doing a DNS lookup.
I ended up adding these two records to my DNS server:
napp-service.sddc.lab.		A	10.203.240.60
napp-messaging.sddc.lab.	A	10.203.240.69
Deploy NSX Application Platform
NAPP is deployed from the NSX Manager UI. It’s a wizard-driven deployment process that is easy to go through.
We navigate to System > NSX Application Platform and click on Deploy NSX Application Platform:

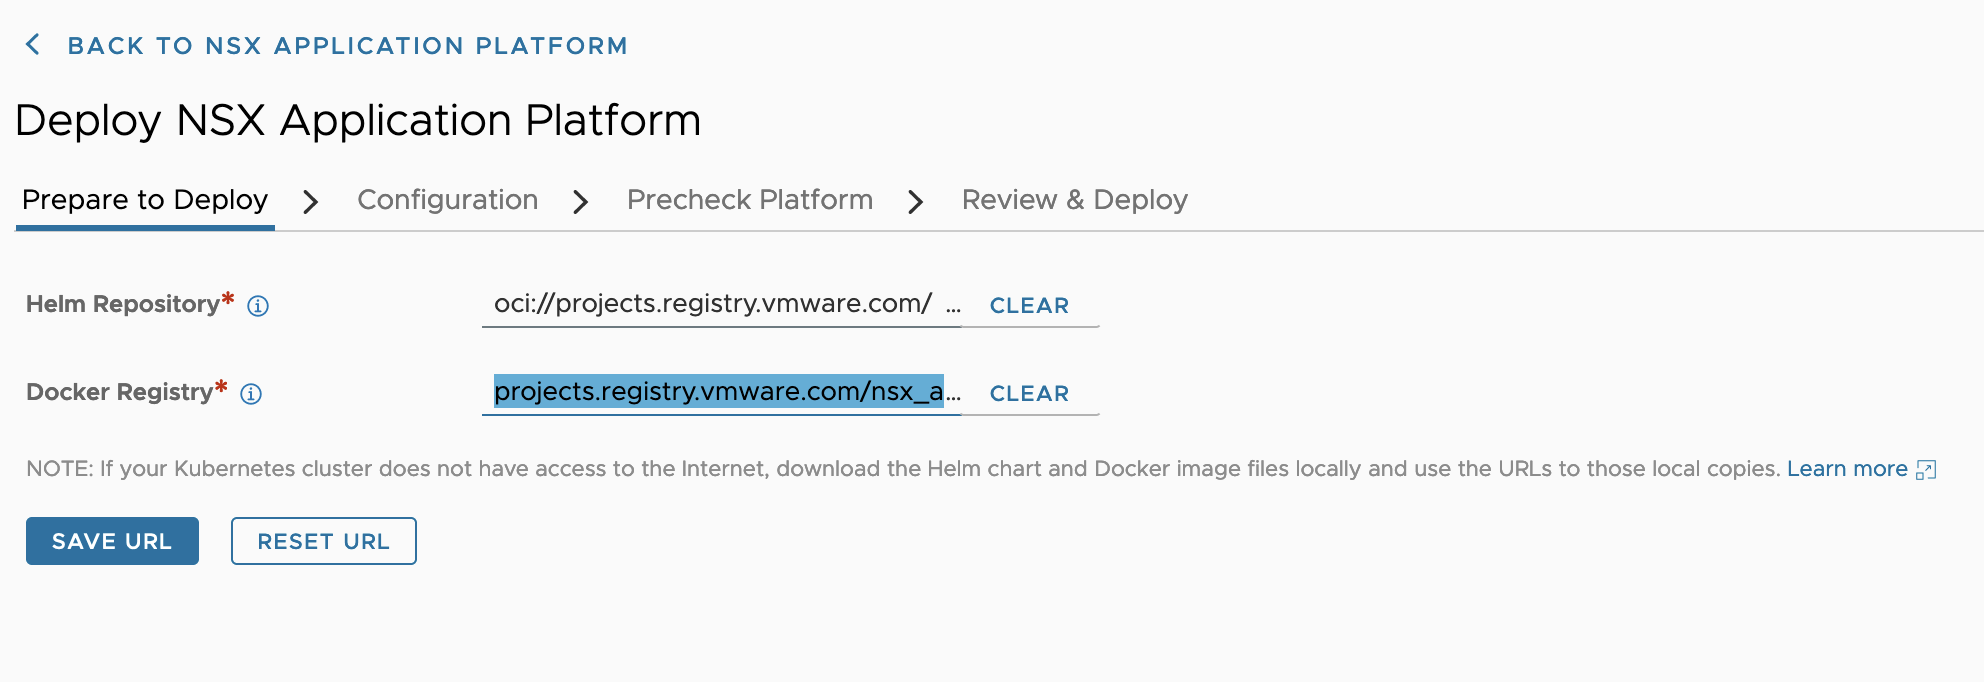
We use the following URLs for Helm and Docker:
- Helm Repository:
oci://projects.registry.vmware.com/nsx_application_platform/helm-charts - Docker Registry:
projects.registry.vmware.com/nsx_application_platform/clustering
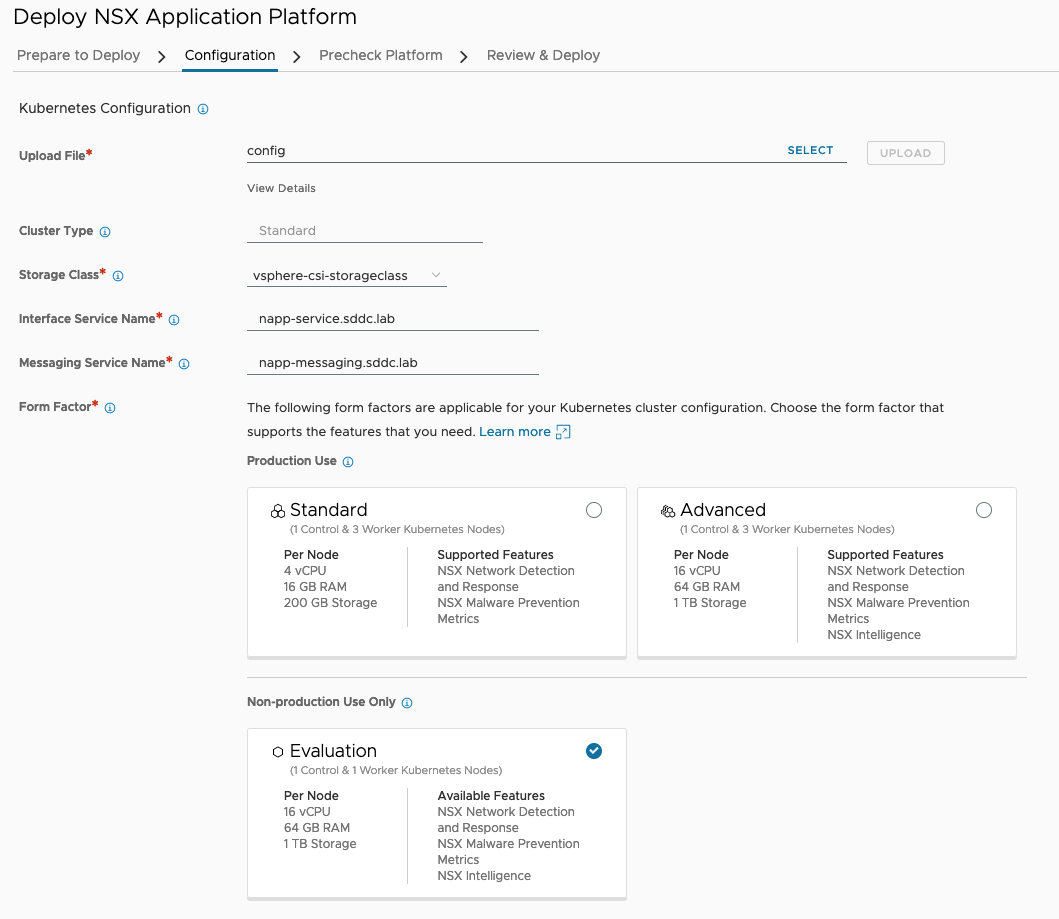
On the next step in the deployment wizard (Configuration) we need to upload our Kubernetes configuration file. In my case I simply copied that file from the Control node. It’s located here: ~/.kube/config.
Other values entered during the Configuration step:
- Storage Class:
vsphere-csi-storageclass - Interface Service Name:
napp-service.sddc.lab - Messaging Service Name:
napp-messaging.sddc.lab - Form Factor: Evaluation
In the next step we run the pre-checks:

Note that the warning on the Time Synchronization pre-check is not critical and will not impact the NAPP deployment process.
At the last step, Review & Deploy, we kick off the NAPP deployment:

Deploying NAPP will take a while so now is a good time for some coffee and leg stretching:

Once the deployment has finished you’ll hopefully be welcomed by a screen like the one below which confirms that the platform is up and running:

Enable Features
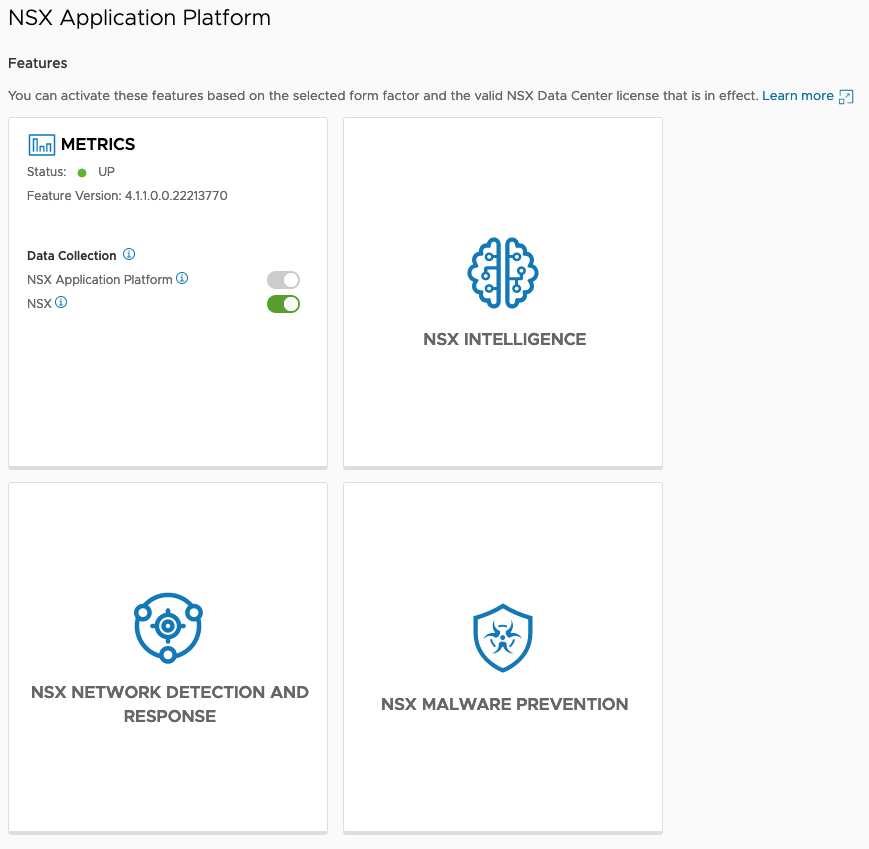
Now that NAPP is in place we can enable the different features that are powered by it:
- Metrics
- NSX Intelligence
- NSX Network Detection And Response
- NSX Malware Prevention
To enable the NSX Intelligence feature we hover over the NSX Intelligence tile and click Activate. A number of pre-checks must be run before we can activate the feature:
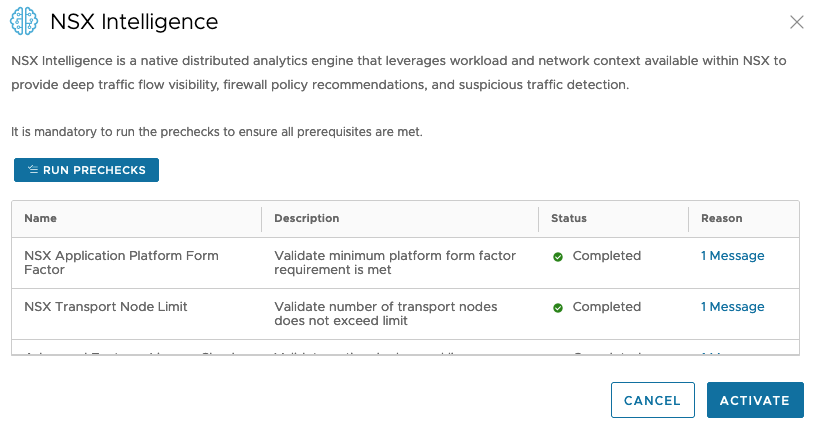
Once pre-checks completed successfully we can click Activate. This will activate the NSX Intelligence feature. Behind the scenes NSX Intelligence specific Kubernetes Pods are being created and instantiated. This process might take a while to complete and the result should look something like this:

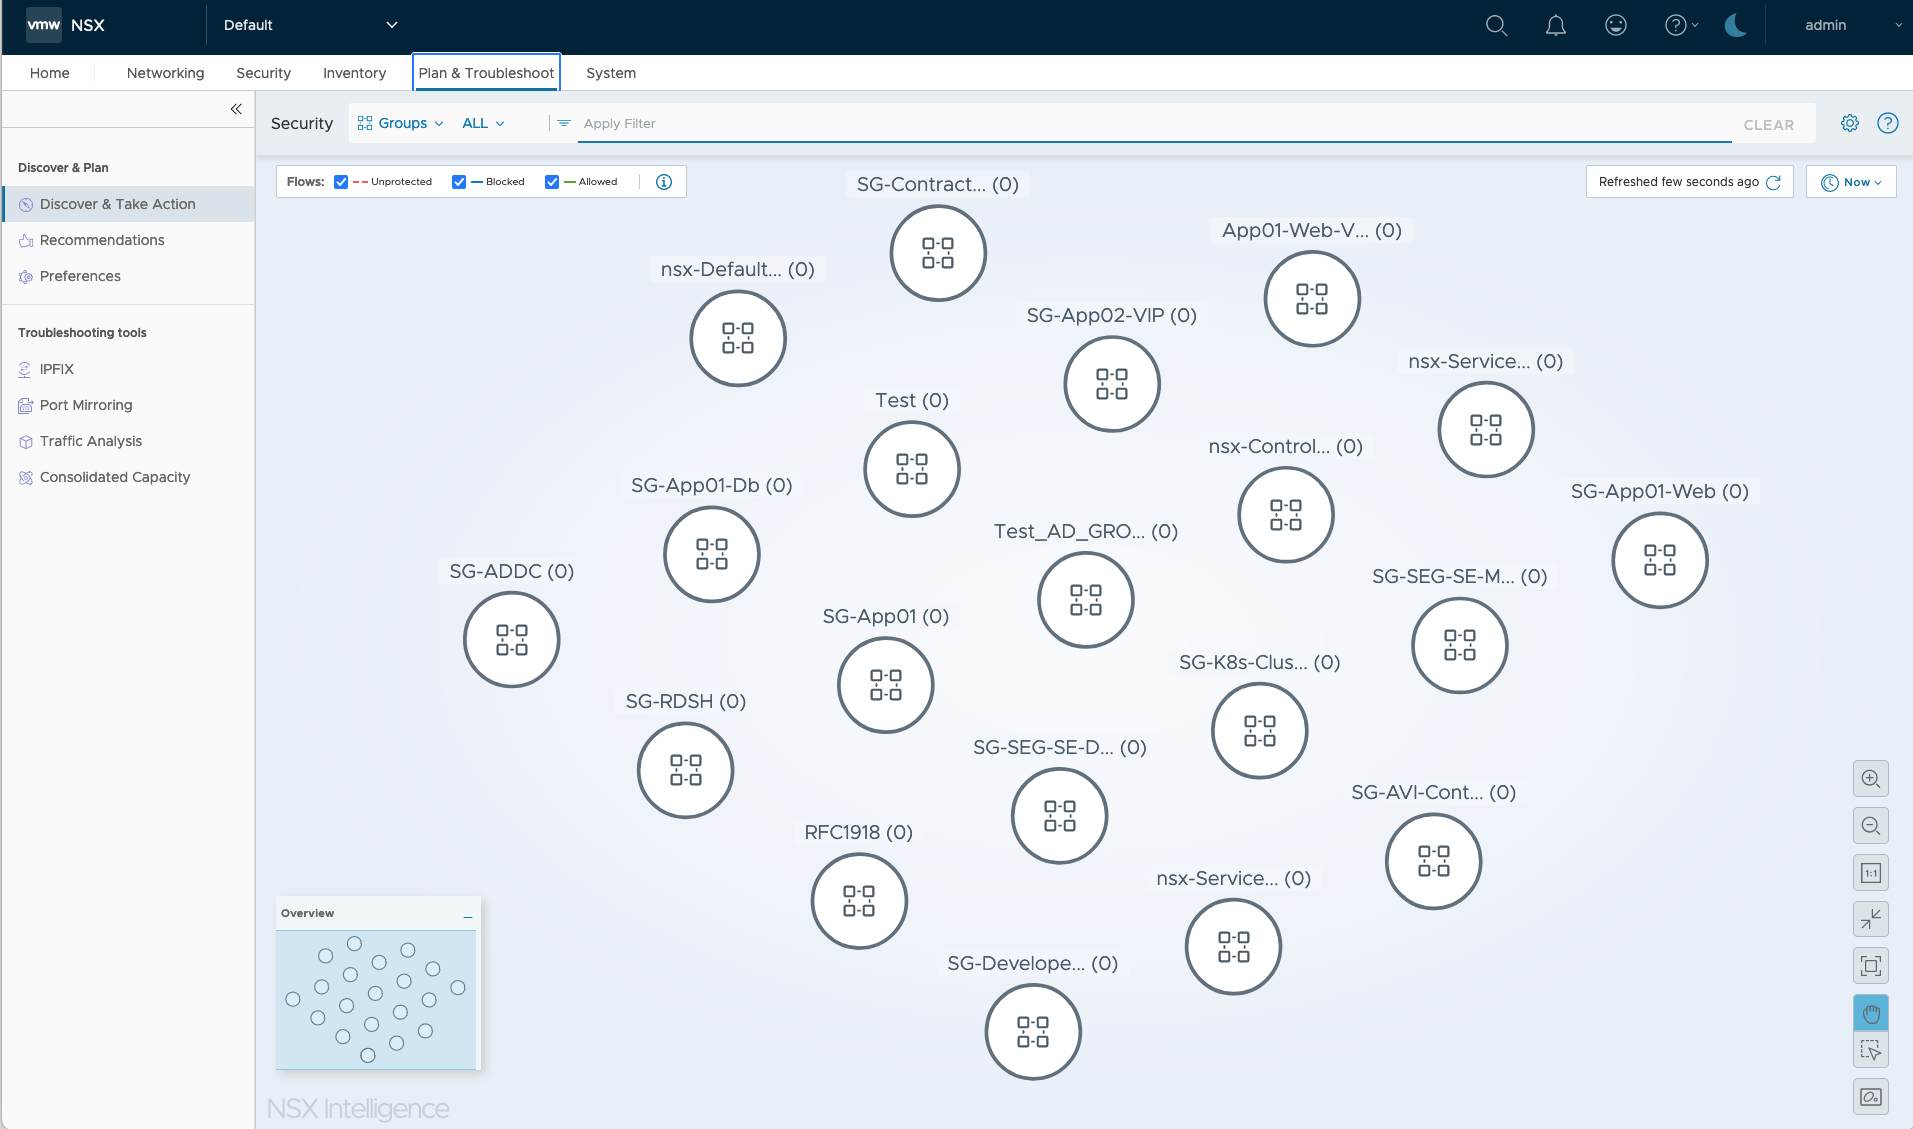
With the feature active we can start using NSX Intelligence for the automatic mapping and analytics of network communication flows. The module is found in the NSX Manager UI under Plan & Troubleshoot > Discover & Take Action:
Summary
This completes my installation documentation on deploying the NSX Application Platform in my lab environment. I hope you found it useful.
Thanks for reading.

Leave a comment