
NSX 4.1.2 introduces support for Generic Routing Encapsulation (GRE) tunnels for Tier-0 gateways and Tier-0 VRF gateways offering another standards-based option for “plumbing” network paths that lead traffic into and out of the Software-Defined Data Center (SDDC).
In today’s short article I’ll go over configuring a GRE tunnel in order to facilitate communication between two environments. This article is not a comprehensive walkthrough by any means. Certain prerequisites have been taken care of in advance and building things in a lab means one can take shortcuts never to be taken in a production environment. Nevertheless, this article should provide you with a basic understanding of how GRE tunnels are configured and managed in NSX 4.1.2.
Lab Environment
The following are the components in the lab environment that are relevant for today’s exercise:
- NSX 4.1.2
- vSphere 8
- VyOS 1.4 ( the remote router)
Diagram
The diagram below shows what it is we’re trying to put together:

A Tenant (Blue) has a virtual machine connected to an NSX overlay segment which in turn is attached to a Tier-1 gateway. The tenant’s VRF gateway connects the environment to the outside world (and vice versa). Remote to this environment our tenant has another environment hosting some applications.
We are tasked with configuring connectivity between those environments and for this we should make use of the new GRE tunnel support in NSX 4.1.2. Naturally, routing should also be configured so that the tenant’s VM (10.203.246.20) is able to communicate with the server (172.16.20.20) in the tenant’s remote environment. Let’s see how this is done!
Configuring GRE Tunnels
Network tunnels have endpoints (interfaces) and GRE tunnels are no exception. We begin by configuring the GRE tunnel endpoint on the tenant’s VRF gateway and then do the same on the remote router.
NSX VRF Gateway
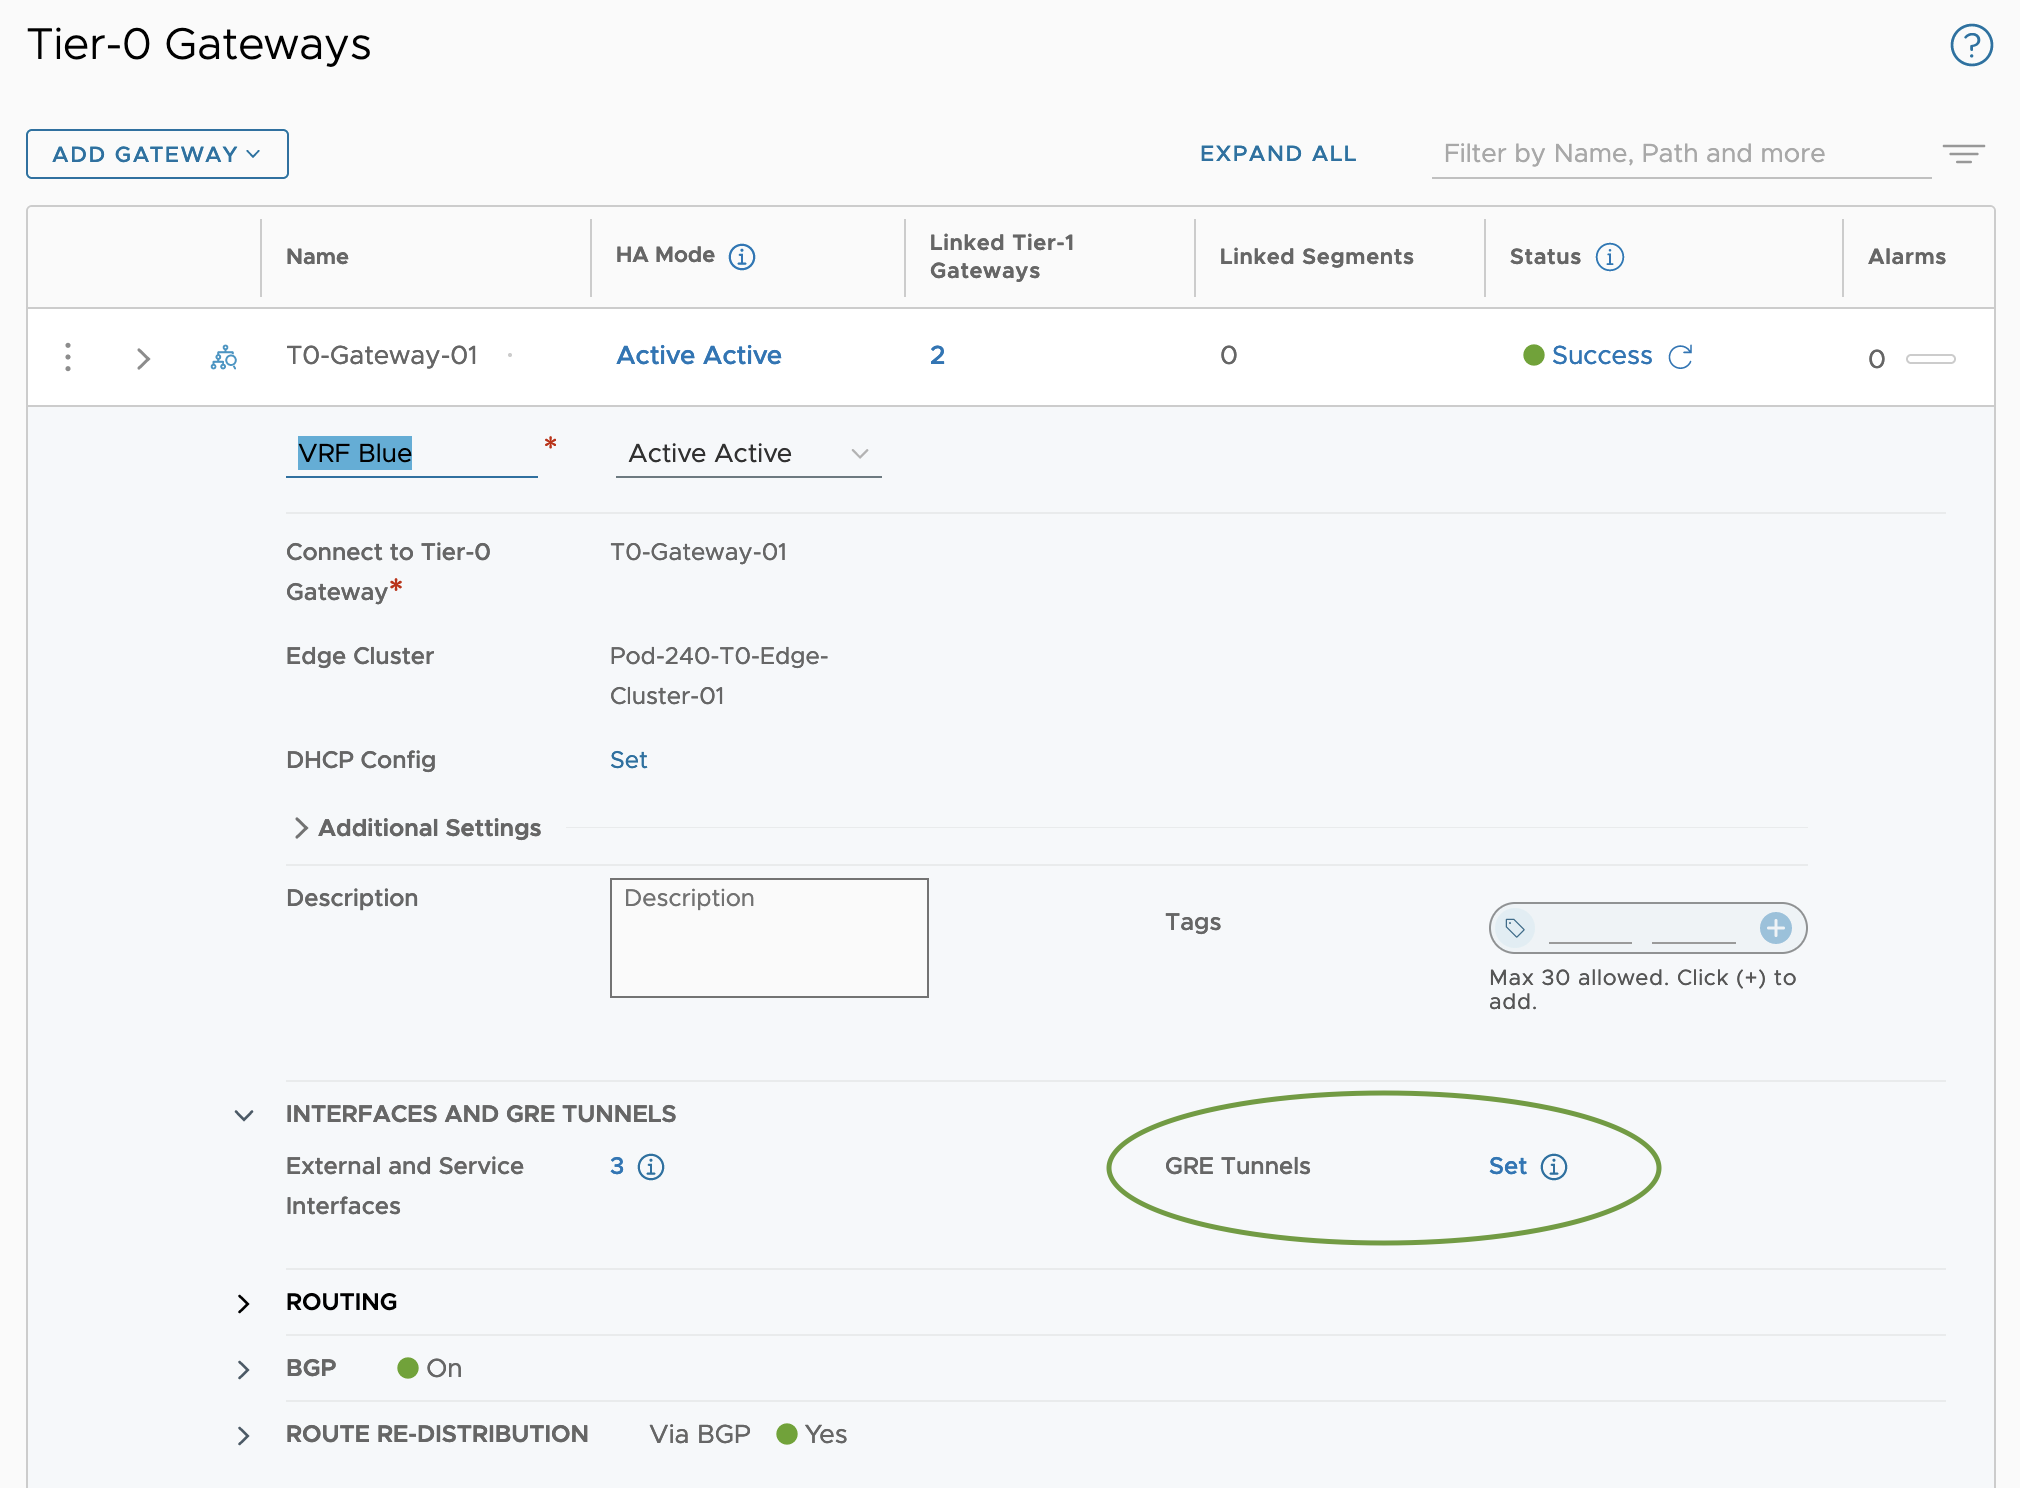
In NSX Manager we navigate to Networking > Tier-0 Gateways and edit the Tier-0 VRF gateway called VRF Blue. Click on Set to the right of GRE Tunnels.
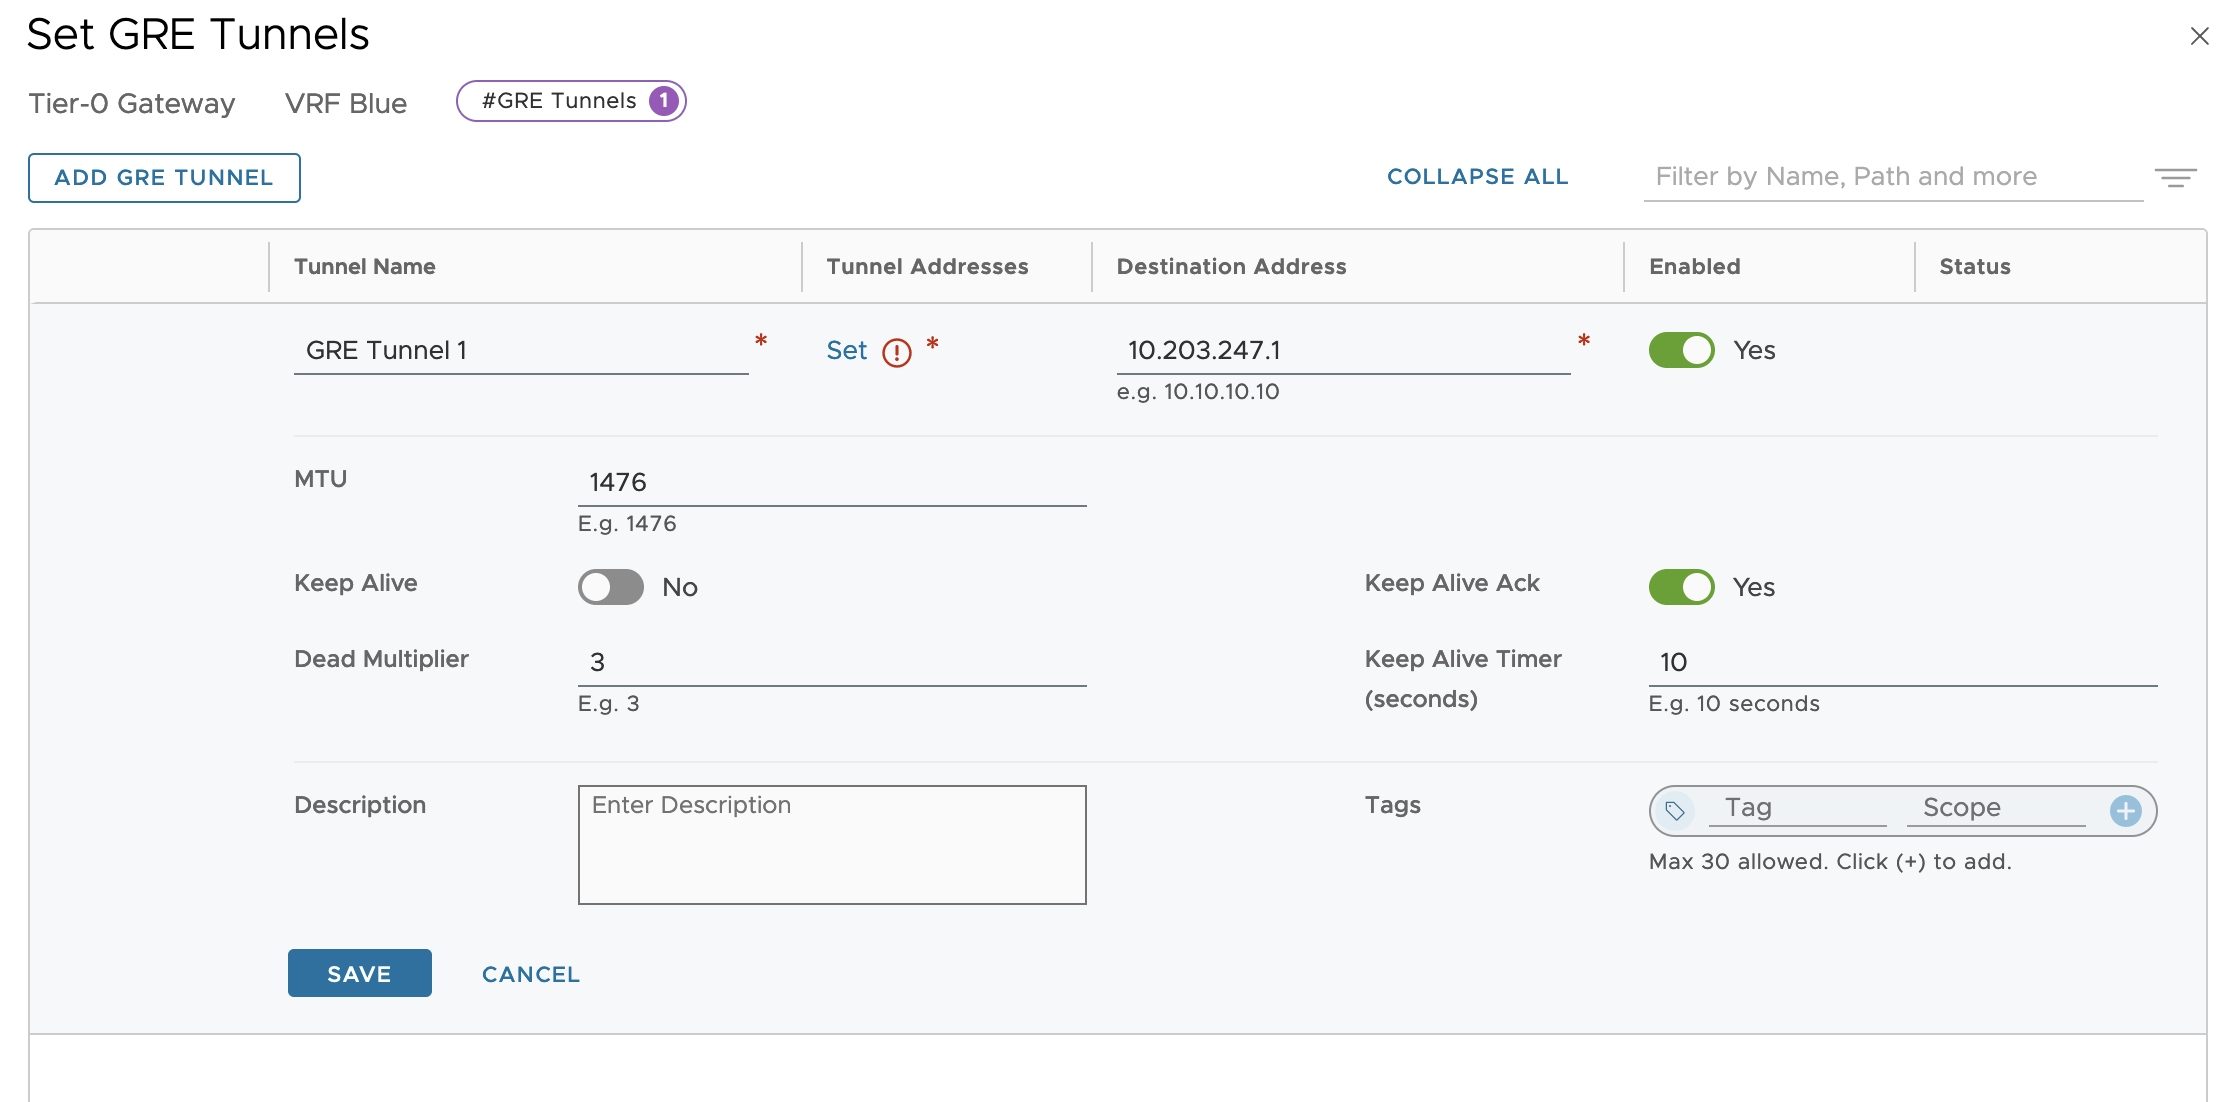
In the Set GRE Tunnels dialog we click the Add GRE Tunnel. This is where we get to configure settings and parameters for our GRE Tunnel.
In my lab environment I’m using the following settings:
| Item | Value | Description |
|---|---|---|
| Tunnel Name | GRE Tunnel 1 | Name of the GRE tunnel |
| Destination Address | 10.203.247.1 | Remote router external IP address |
The rest of the settings are left with the default values. Note that the MTU size is set to 1476 bytes and that Keep Alive can be enabled and configured if required:
In the Tunnel Addresses column we click on Set to further configure the tunnel properties. Here I’m using the following settings in my lab environment:
| Item | Value | Description |
|---|---|---|
| Edge Node | Pod-240-EdgeVM-01 | The NSX Edge node that will be hosting the GRE tunnel- |
| Source Address | 10.203.246.2 | The source IP address to be used. A VRF source interface is selected from the list. Both external interfaces and loopback interfaces can be used here. Just make sure that this IP address is reachable by the remote router. |
| Tunnel Interface Subnets | 192.168.100.1/30 | The IP subnet (and address) attached to this GRE tunnel interface. |

This completes the GRE tunnel configuration on the NSX side.
Remote Router
The remote router (VyOS in this case) needs to be configured in much the same way in order to establish a GRE tunnel with the NSX VRF gateway:
set interfaces tunnel tun100 encapsulation gre
set interfaces tunnel tun100 remote 10.203.246.2
set interfaces tunnel tun100 source-address 10.203.247.1
set interfaces tunnel tun100 address 192.168.100.2/30
set interfaces tunnel tun100 mtu 1476
The above commands are rather self-explanatory but let’s have a quick look at them anyway:
| Item | Value | Description |
|---|---|---|
| tunnel | tunn100 | Name of the tunnel interface |
| encapsulation | gre | Tunnel encapsulation protocol. Must be the same on both sides GRE it is. |
| remote | 10.203.246.2 | NSX VRF Blue’s external/reachable IP address |
| source-address | 10.203.247.1 | The source IP address to be used |
| address | 192.168.100.2/30 | The IP subnet (and address) attached to this GRE tunnel interface. |
| mtu | 1476 | MTU size (matching the MTU size we have on the NSX VRF) |
Validate Tunnel
Now that both the NSX VRF gateway and the remote router are configured, it’s time to check whether a GRE tunnel has actually been established.
In the NSX Manager UI we can check tunnel status from the VRF within the GRE Tunnels dialog:

Clicking Tunnel Connectivity Status brings up the dialog where
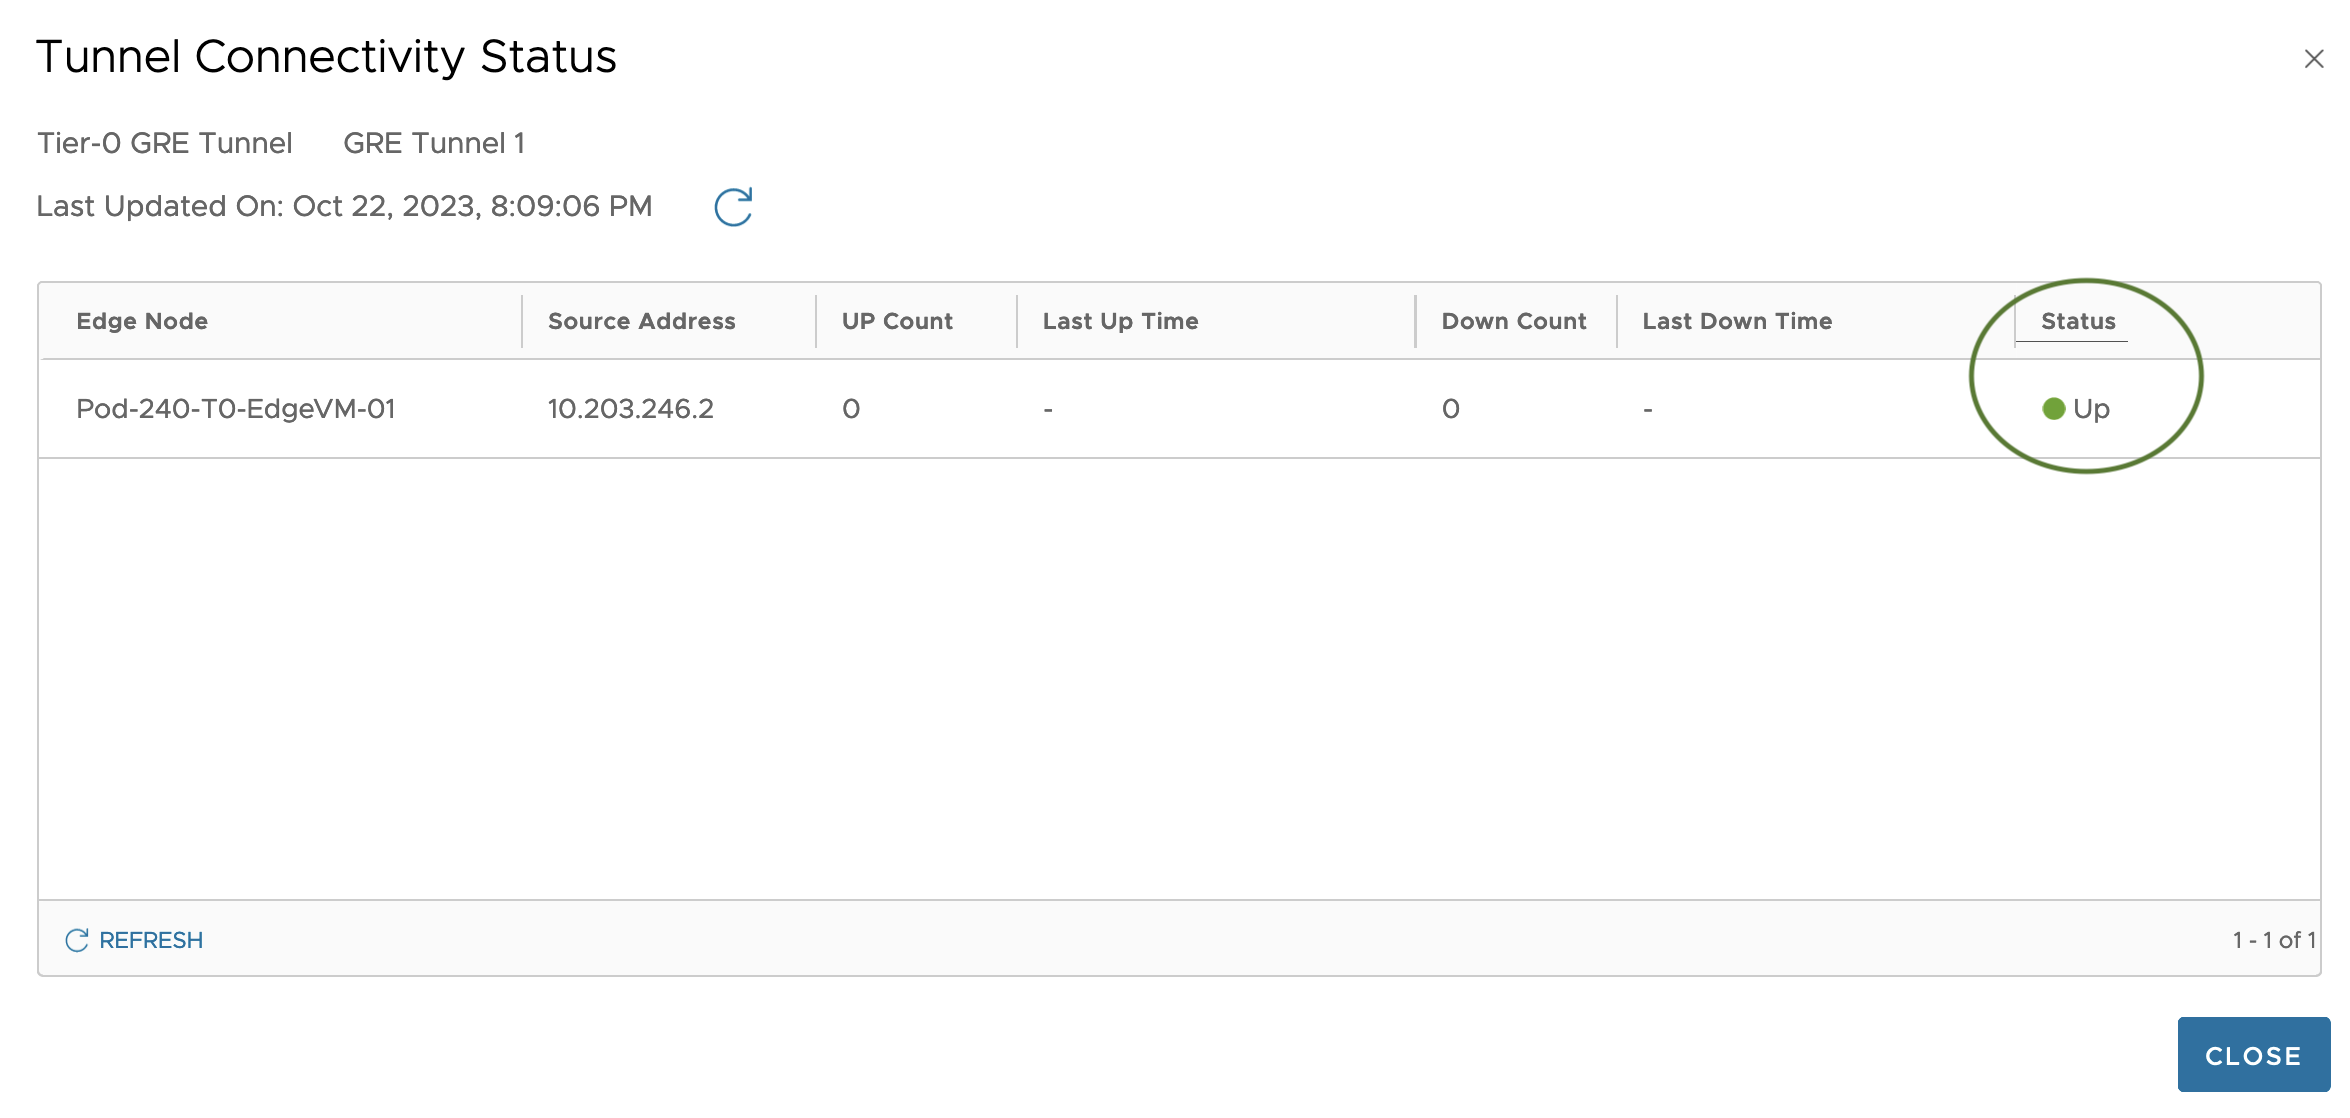
Status is Up which seems good to me.
On the remote router we can use to following command to validate the status of the GRE tunnel:
show interfaces tunnel tun100 brief

Adding Static Routes
Before we can test network communication between the tenant’s virtual machine and the tenant’s server, routing information is required. We might have a GRE tunnel up and running, but at this point the virtual machine has no clue on how to get to the server and the other way around. In our scenario we’ll simply solve this by adding a static route to each router.
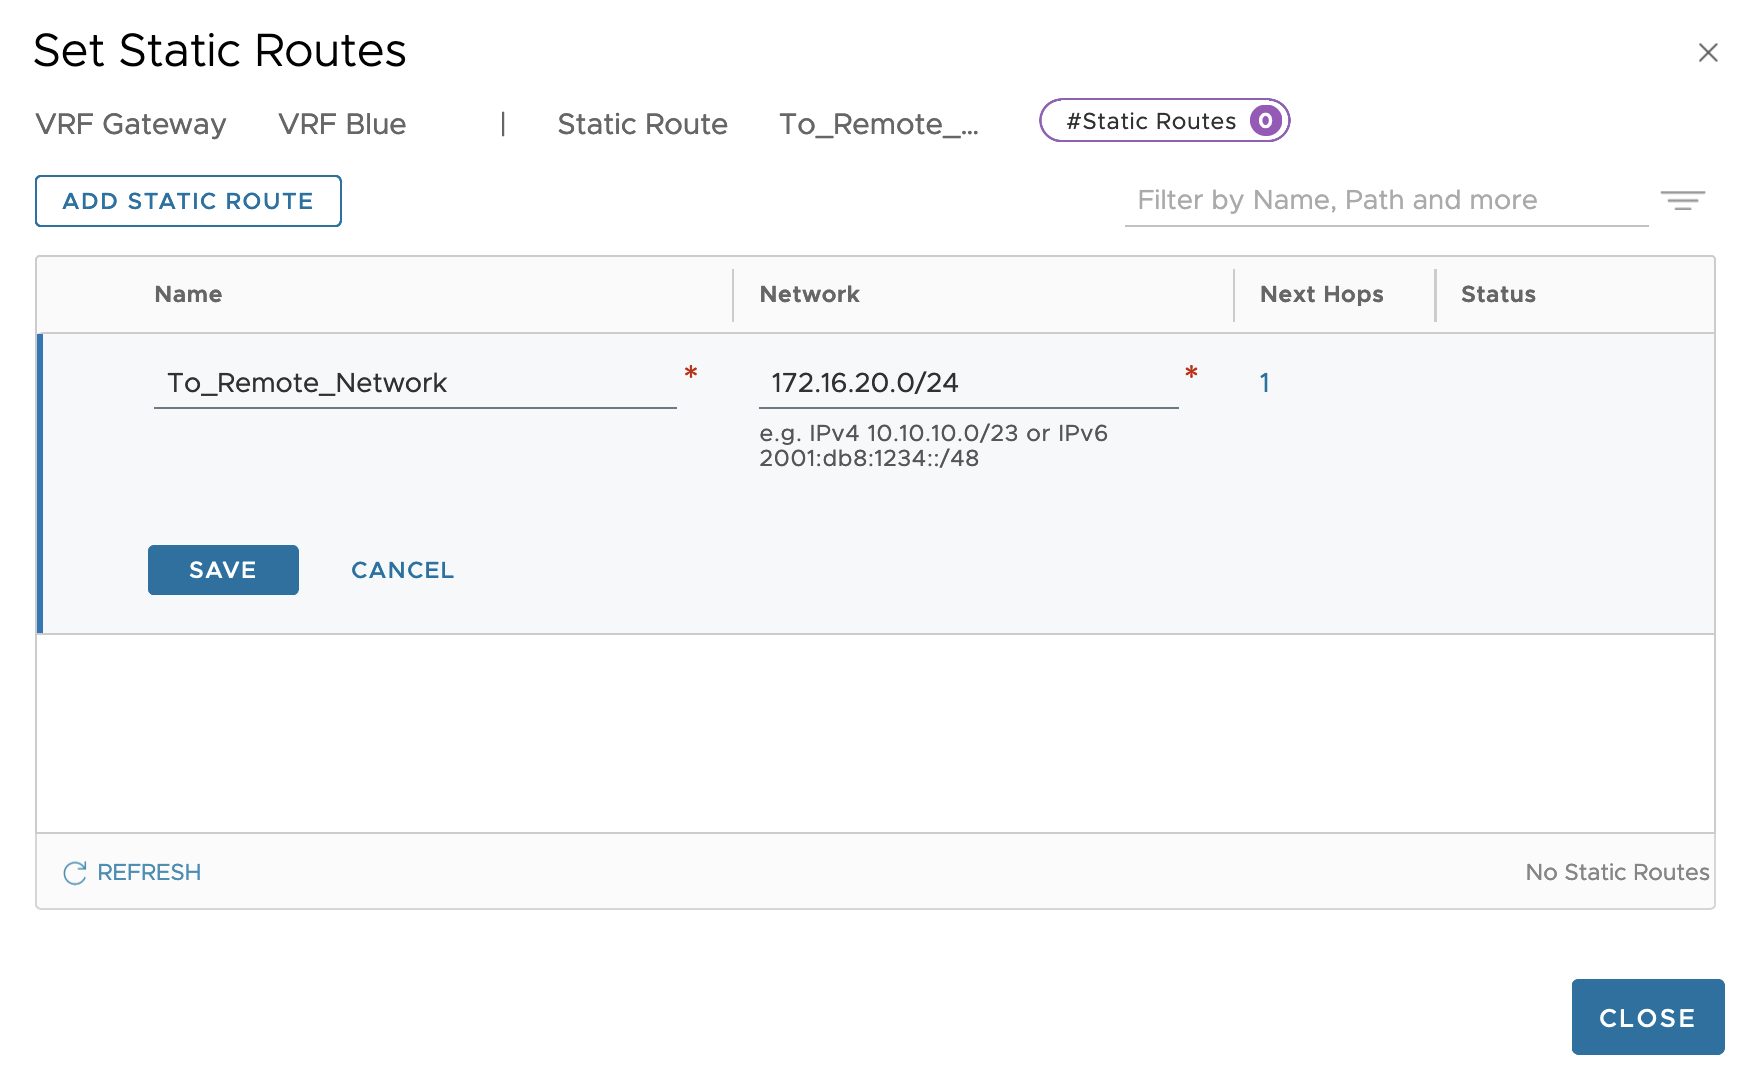
On the NSX VRF gateway we add a static route that ensures that traffic heading towards the 172.16.20.0/24 network will use 192.168.100.2 (tunnel interface IP address on remote router) as the next hop:

Similarly, on the remote router we add a static route so that it knows the 10.204.246.0/24 network is reached via 192.168.100.1 (the tunnel interface IP address on the NSX VRF):
set protocols static route 10.204.246.0/24 next-hop 192.168.100.1
Validate Communication
GRE tunnels in place, static routes in place. Communication between the tenant’s virtual machine and their remote server should now be working. Let’s do a quick test.
Good old ping always sometimes comes in handy for these kinds of tests:
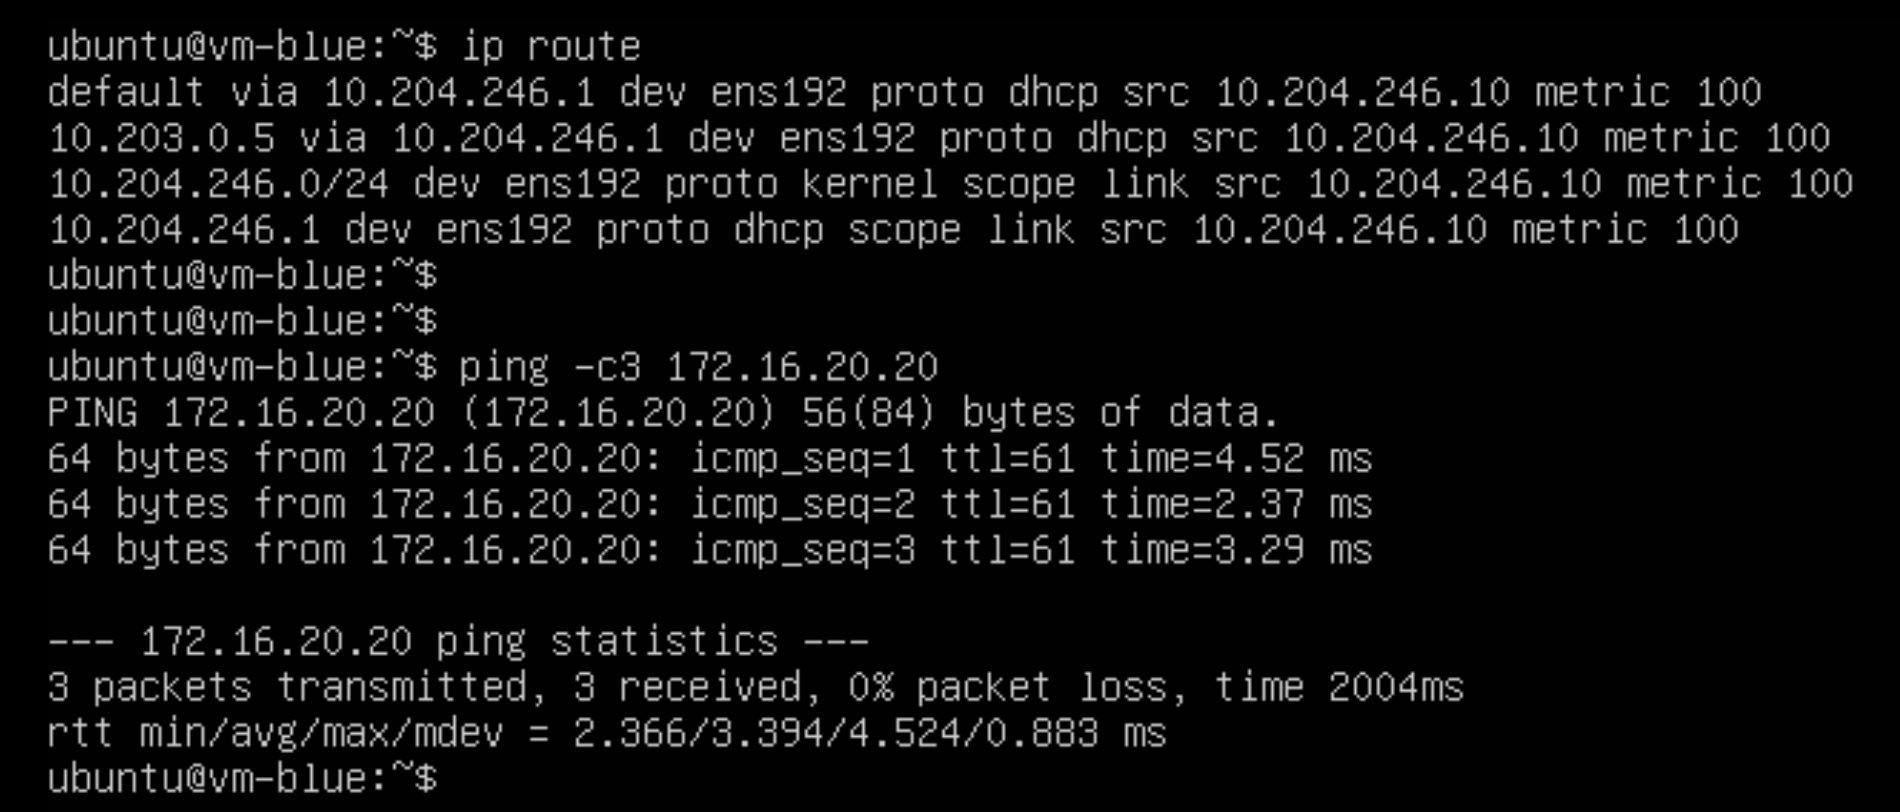
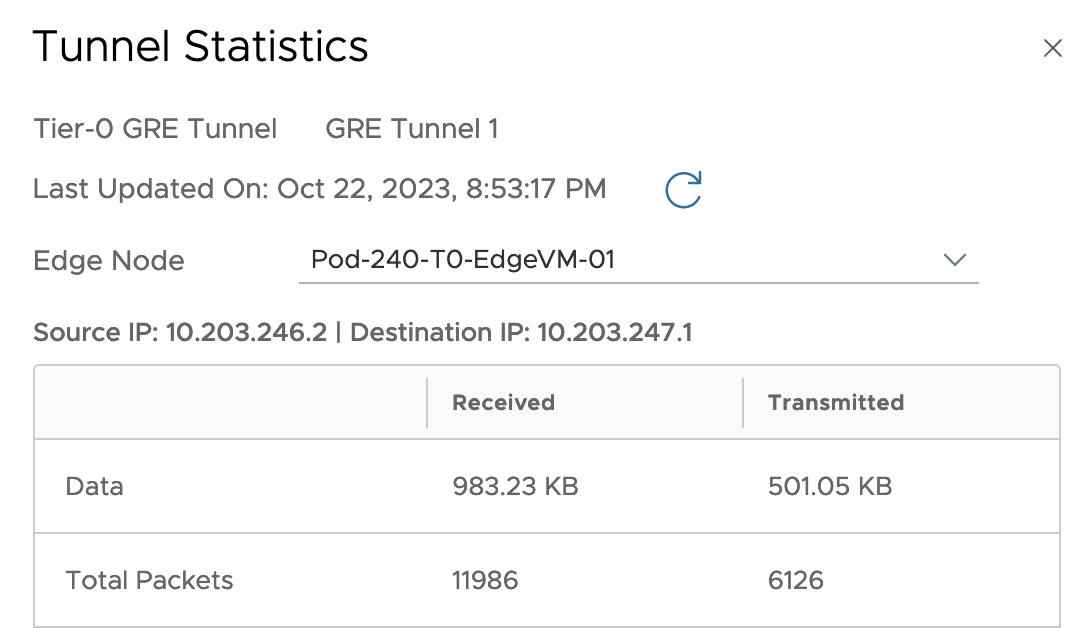
Starting a ping from the virtual machine to the server in the remote environment at the other side of the tunnel seems to work fine. Tunnel statistics on the NSX side also seem to indicate that packets are indeed being transmitted and received over our GRE tunnel:
Mission completed!
Summary
This article provided an overview of the new GRE tunnel feature in NSX 4.1.2 which is giving us another option for establishing network connectivity between different environments. Although the scenario we used in this article is kind of “conceptual” and more is to be considered in a real life production scenario, I hope you at least got an idea on how GRE tunnels are implemented in NSX 4.1.2.
Make sure to check the latest NSX documentation including the release notes to learn more about NSX 4.1.2 and its new features. The NSX Reference Design Guide is another great resource for further reading and learning all about the VMware NSX solution.
Thanks for reading.

Leave a comment