One of the great benefits of the NSX Distributed Firewall (DFW) is the flexibility it offers when it comes to developing security policy models. Implementation of the application intrinsic NSX DFW always begins with looking at the business needs and then continues with development of a security policy model aligned with those needs.
On the other hand, the enormous flexibility offered by the NSX DFW can also become quite intimidating. Teams or individuals that are tasked with securing an organization’s applications using the NSX Distributed Firewall might sometimes wonder where to begin.
In today’s article I want to share three examples on how one could get started with securing applications using the NSX DFW without having to allocate much time and resources.
- Example 1 – Security Policy Model Based On Environments
- Example 2 – Security Policy Model Based On Organization Structure
- Example 3 – Security Policy Model Based On Applications
These examples might show you that it’s possible to implement robust application security with relatively little effort. By aligning the security policy model with existing constructs you should be able to grab some of the “low hanging-fruit” and kickstart your NSX Security project. Let’s have a look.
Example 1 – Security Policy Model Based On Environments
A security policy model that is based on the logical environments and/or security zones in your software-defined data center. The assumption here is that these are already defined otherwise this approach will become very time consuming instead. 😉 For example you might be looking at the following environments:
- Development
- Staging
- Production
Implementation
- Assign NSX tags to the workloads that are in scope. If a workload belongs to the Development environment you assign a tag called “development” to the workload. Similarly, production workloads receive the “production” tag. If possible make use of tools like the NSX API or PowerCLI to automate the assigning of tags to workloads. It will save you a lot of time.
- Create NSX groups matching the environments. Membership should be dynamic and based on tag. For example the “Staging” group will have a membership criteria stating that workloads tagged with “staging” should become members.
- Create a security policy for each environment in the DFW. Policies for this particular model fit well under the “Environment” category within the Distributed Firewall.
The last step is to populate the policies with rules. For example each policy could have two rules to ensure that lateral movement between the environments is prohibited:
Policy Development
| Sources | Destinations | Services | Action |
|---|---|---|---|
| Development | Development | Any | Allow |
| Development | Staging, Production | Any | Drop |
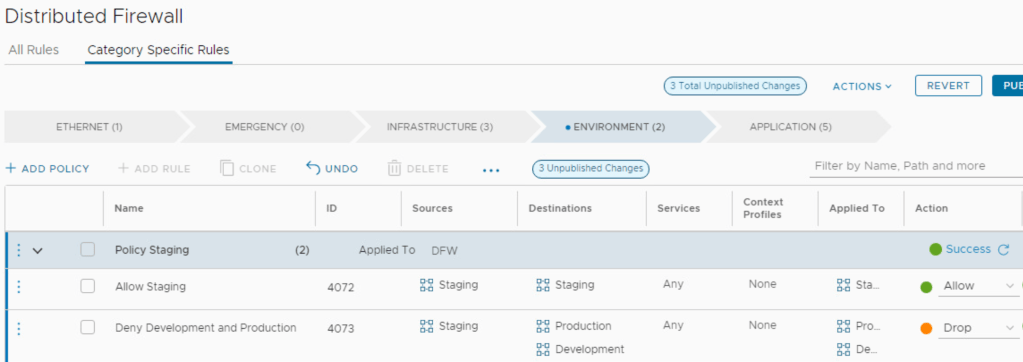
Policy Staging
| Sources | Destinations | Services | Action |
|---|---|---|---|
| Staging | Staging | Any | Allow |
| Staging | Development, Production | Any | Drop |
Policy Production
| Sources | Destinations | Services | Action |
|---|---|---|---|
| Production | Production | Any | Allow |
| Production | Staging, Development | Any | Drop |
With environments/zones predefined, implementing the NSX DFW using the above approach could be a relatively quick exercise.
Example 2 – Security Policy Model Based On Organization Structure
The organization structure consists of business units or departments which are used as the basis of this security policy model. This approach makes sense when business units/departments are treated as tenants and each have their own set of independent applications. Your list could look like this:
- HR
- Finance
- Sales
Implementation
- Assign NSX tags to the workloads in scope. If a workload is owned by HR you assign a tag called “hr” to that workload. Similarly, workloads owned by the Sales department get the “sales” tag assigned to them. Again, use tools to automate tagging of workloads if possible.
- Create an NSX group for each business unit/department. Membership should be dynamic and based on tag. For example the “Finance” group will have a membership criteria stating that workloads tagged with “finance” should become members.
- Create a security policy for each department in the DFW. Departments are like “environments” from our perspective, so these policies too are created under the “Environment” category in the Distributed Firewall.
The last step is to populate the policies with rules. For example each policy could have two rules to ensure that lateral movement between departments is prohibited:
Policy HR
| Sources | Destinations | Services | Action |
|---|---|---|---|
| HR | HR | Any | Allow |
| HR | Finance, Sales | Any | Drop |
Policy Finance
| Sources | Destinations | Services | Action |
|---|---|---|---|
| Finance | Finance | Any | Allow |
| Finance | HR, Sales | Any | Drop |
Policy Sales
| Sources | Destinations | Services | Action |
|---|---|---|---|
| Sales | Sales | Any | Allow |
| Sales | Finance, HR | Any | Drop |

When business units/departments run their own independent applications, implementing the NSX DFW using a security policy model that is aligned with the organization structure could be a quick way to increase the level of security for applications.
Example 3 – Security Policy Model Based On Applications
Here the applications themselves are the basis of the security policy model. This one works well as a “getting started” approach in environments where applications are well documented and run on dedicated application workloads. In other words, an application maps to workloads that are only serving the application. Here’s a list with some (fictional) applications we can work with:
- MorphMind
- EcoEff
- HabitHive
Implementation
- Assign NSX tags to the application workloads in scope. If a workload is used by the MorphMind app you assign a tag called “morphmind” to that workload. Similarly workloads used by the HabitHive app get the “habbithive” tag assigned.
- Create an NSX group for each application. Membership should be dynamic and based on tag. For example the “EcoEff” group will have a membership criteria saying that workloads tagged with “ecoeff” should become members.
- Create a security policy for each application in the DFW. We’re working with applications now so these policies fit nicely under the “Application” category within the DFW.
The last step is to populate the policies with rules. For example each policy could have two rules to ensure that lateral movement between these applications is prohibited:
Policy MorphMind
| Sources | Destinations | Services | Action |
|---|---|---|---|
| MorphMind | MorphMind | Any | Allow |
| MorphMind | EcoEff, HabitHive | Any | Drop |
Policy EcoEff
| Sources | Destinations | Services | Action |
|---|---|---|---|
| EcoEff | EcoEff | Any | Allow |
| EcoEff | MorphMind, HabitHive | Any | Drop |
Policy HabitHive
| Sources | Destinations | Services | Action |
|---|---|---|---|
| HabitHive | HabitHive | Any | Allow |
| HabitHive | EcoEff, MorphMind | Any | Drop |

Using this approach lateral movement between applications is prohibited and gives a high level of application security. For many customers this is somewhat of the desired approach. Just keep in mind that a certain level of “hygiene” among the application workloads is required in order to be successful.
Summary
When it comes to securing applications using the NSX Distributed Firewall I always advise customers to start with the low-hanging fruit. It allows for some easy (and critical) wins early on in the battle against all those threats out there. Hopefully the examples in this article give you an idea of what that low-hanging fruit might look like for you in your next NSX Security project.
Thanks for reading.

Leave a comment