Imagine this, you’ve been tasked with implementing micro-segmentation in your vSphere environment. You just deployed and configured NSX-T and the next step is to migrate VMs from their VDS port groups to N-VDS segments.
You fire up the vSphere Client and expand the VDS to have a look at the current situation:

It’s pretty bad.
Turns out your VMs are connected to no less than 784 different port groups! Overlay networking/consolidation and re-IP are currently not part of the plan so you’re stuck with these 784 VLANs. You now realize that you need to create 784 VLAN backed segments in NSX-T. Life sucks.
Postman to the rescue
In today’s short post I want to share an easy way that can help you out in a scenario like the one above. It involves the NSX-T Policy API, Postman, and a text file. Let’s go!
Step 1 – Prepare the CSV file
First we need to create a simple text file that contains values for the NSX-T segments and their corresponding VLAN IDs. The format of the comma separated text file is as follows:
segment_name, vlan_id
vlan-1000, 1000
vlan-1001, 1001
vlan-1002, 1002
vlan-1003, 1003
....
....
vlan-1783, 1783
For “segment_name” you use whatever fits your naming convention. I’m saving this file as “segments.csv”:

Step 2 – Prepare the Postman request
We’re going to leverage the NSX-T Hierarchical API to create these segments by making a PATCH request to:
https://{{nsx-manager-fqdn}}/policy/api/v1/infra
Only a small piece of JSON code is needed in the request body:
{
 "resource_type": "Infra", "children": [{
 "resource_type": "ChildSegment", "marked_for_delete": "false", "Segment": {
 "resource_type": "Segment",
 "type": "DISCONNECTED",
 "id": "{{segment_name}}",
 "display_name": "{{segment_name}}",
  "vlan_ids": [
         "{{vlan_id}}"
       ],
 "path": "/infra/segments/{{segment_name}}",
 "relative_path": "{{segment_name}}",
 "parent_path": "/infra/segments/{{segment_name}}",
 "transport_zone_path": "/infra/sites/default/enforcement-points/default/transport-zones/e82afbae-c811-48e1-8946-6e1f62b67871"
 } }]
 }
As you can see the variables “{{segment_name}}” and “{{vlan_id}}” are used a couple of times in this piece of code. Their values will be fetched from the matching columns in the ”segments.csv”.
The value for “transport_zone_path” is unique in every NSX-T deployment. You can easily find the ID of your VLAN transport zone in the NSX Manager UI under System > Configuration > Fabric > Transport Zones:

Putting it all together the Postman request will look like this:

I’m saving this request as “Create NSX-T Segments with data file” in a new collection folder called “NSX-T”.
Step 3 – Start the Postman Runner
Click the Runner button to start the collection runner:

In the next screen you select the saved request:

We need to configure a couple of things for this run. The table below lists my settings:
| Setting | Value | Comment |
|---|---|---|
| Environment | Your NSX-T environment | Have a look at this post for more information about working with Postman environments. |
| Iterations | 784 | We have 784 segments in our data file. |
| Data | segments.csv | The data file. |

After selecting your data file you can click the Preview button just to verify that Postman is interpreting the data correctly:

Looks pretty good to me. Time to press the big button:
Running these 784 iterations will take a couple of minutes. You can monitor the progress in the “Run Results” screen:

Notice the “200 OK” status for each iteration which is the NSX-T API’s response to the requests and means it was processed successfully.
Once the Runner is finished it’s time to have a look in the NSX Manager UI under Networking > Connectivity > Segments to see if new segments have been created:
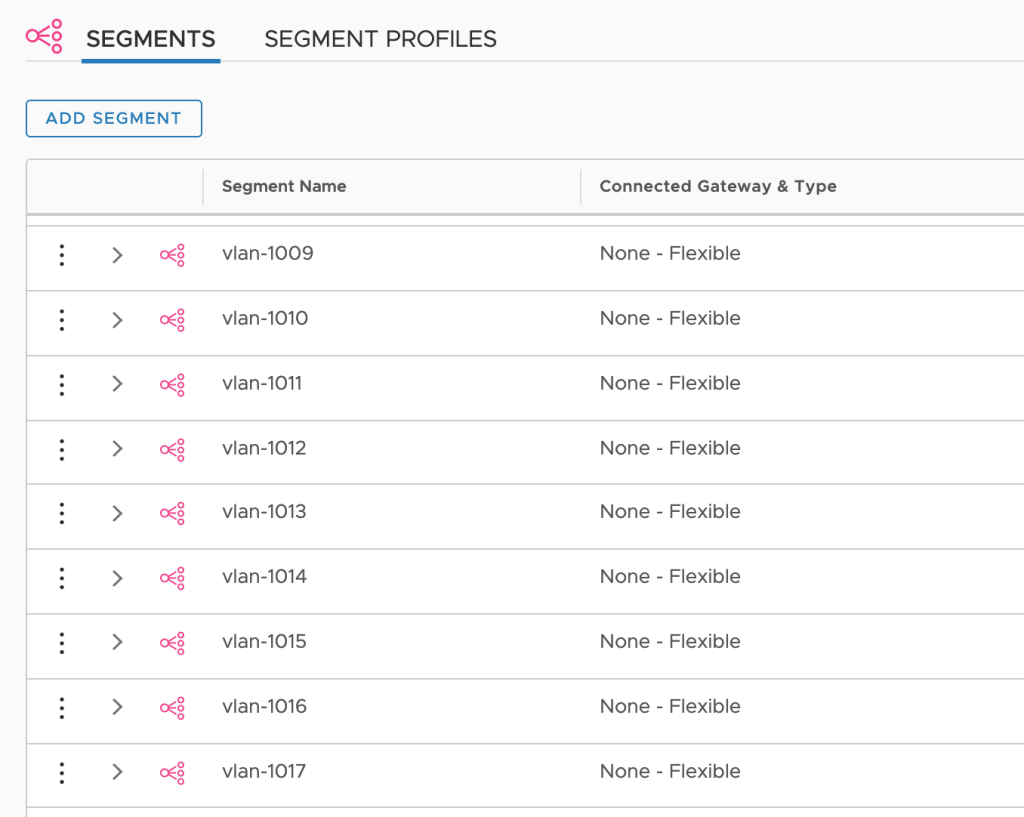
That certainly seems to be the case. All of the 784 VLAN backed segments are there and configured with the correct transport zone and VLAN ID:

Summary
Bulk creating or modifying NSX-T objects can be done in a number of different ways. If coding is your thing you’ll probably have little trouble putting together a tool for this using your preferred language. If you’re more into scripting you can use something like PowerShell. And if you like to work really slow you can always turn to the NSX Manager UI.
For everybody else there’s Postman. Using this tool in combination with data files offers an easy and quick way for creating or modifying large amounts of NSX-T objects.
You can read more about the NSX-T Policy API in the NSX Policy API: Getting Started Guide. To learn more about working with Postman data files check out this tutorial.
Have fun!
