Having good insight into the different components of a network communication path is key when managing networks. This goes for physical networks and for software defined networks.
Today I’m having a closer look at the NSX-T data path and more specifically how to capture network traffic at different reference points in the NSX-T data path.
The environment
A semi logical overview of my lab environment:
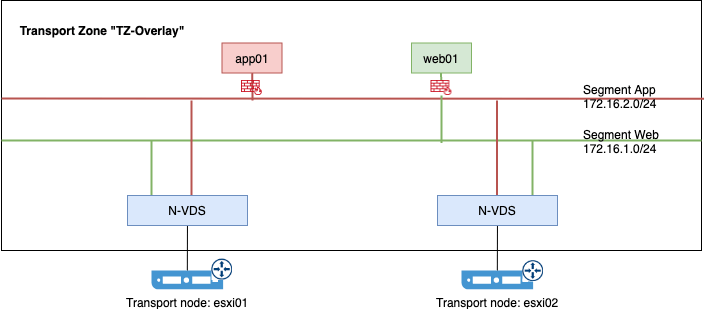
A simple setup. Two ESXi hosts participating in logical NSX-T networking. Two segments each with a virtual machine connected. The two segments are linked to the same distributed logical router which is a Tier-1 gateway in my environment.
The reference points
The beauty of the NSX-T data path is that you can tap into it from many different points. Thanks to this this it’s quite easy to get a holistic picture of a traffic flow. This is invaluable in about any network troubleshooting scenario.
Below a simplified diagram of the reference points in the part of the NSX-T data path that we’ll have a closer look at in this article:

This might look a bit intimidating at first, but it is not too bad actually. All these reference points can be looked into from one and the same ESXi host and by using the same command. Let’s have a look.
Reference point 1 – Pre DVfilter
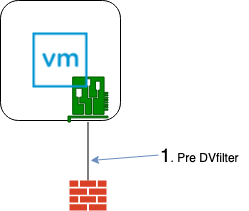
Perhaps we want to capture a virtual machine’s network traffic before it’s being processed by NSX distributed firewall rules.
For this we first need to find the name of the filter in vNic slot 2. It’s at slot 2 the applied NSX DFW rules are living.
On the ESXi host where the virtual machine of interest is running, type the following command:
summarize-dvfilter | less -p virtual_machine_name
For example:
summarize-dvfilter | less -p app01

Now that I know the filter name (nic-2103285-eth0-vmware-sfw.2) I can start capturing packets before they enter the filter.
For example:
nsxcli -c start capture dvfilter nic-2103285-eth0-vmware-sfw.2 stage pre expression dstip 172.16.1.53
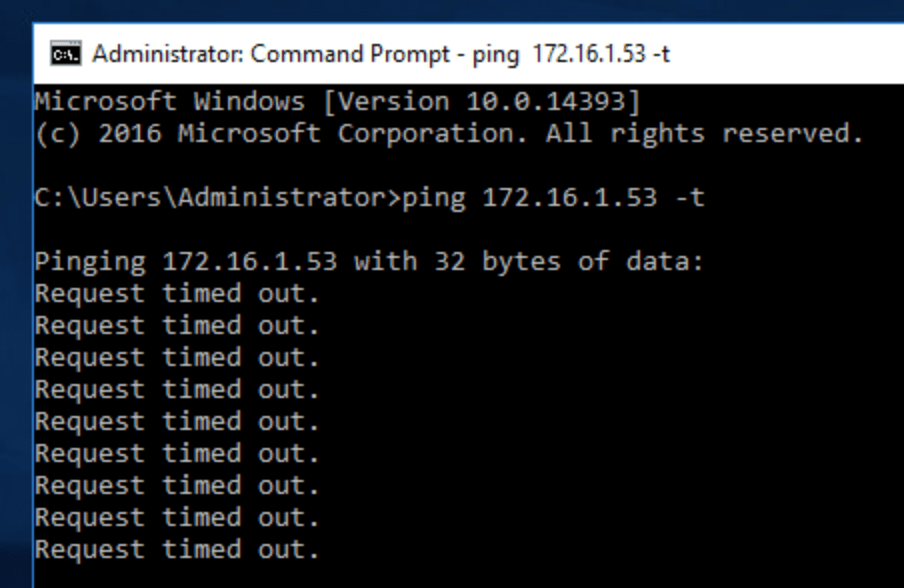
Here the “stage pre” parameter instructs the “nsxcli start capture” command to capture packets before they enter the filter. The output of the command looks like this in my case:

The output shows that virtual machine app01 (172.16.2.50) is trying to ping virtual machine web01 (172.16.1.53) . I’m only seeing echo requests though and no echo replies. Something is not working. Time to look on the other side of the filter!
Reference point 2 – Post DVfilter

So, I run the same command but change “stage pre” to “stage post” to capture packets after they’ve gone through the filter:
nsxcli -c start capture dvfilter nic-2103285-eth0-vmware-sfw.2 stage post expression dstip 172.16.1.53
After waiting 20 seconds or so I still don’t see any echo requests coming through. In other words the filter in slot 2 (DFW) is dropping the ICMP echo requests. No wonder that I don’t see any echo replies!
I quickly create a DFW rule that allows outbound ICMP to 172.16.1.53. All good now, right?
Wrong! It wasn’t that easy. It seldom is.
Alright, but let’s look at traffic after the filter once more:
nsxcli -c start capture dvfilter nic-2103285-eth0-vmware-sfw.2 stage post expression dstip 172.16.1.53

This time the echo requests are coming through at least. But no, still no echo replies. The problem must be further down the data path.
Reference point 3 – vdrPort output
The next component down the NSX-T data path that we can tap into is the vdrPort. The vdrPort is the component that funnels traffic to and from the distributed logical router on an ESXi host:
So let’s continue to investigate the “mystery” with my ICMP traffic. To capture traffic as it enters the the vdrPort I run the following command:
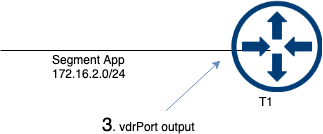
nsxcli -c start capture interface vdrPort direction output expression dstip 172.16.1.53
The “direction output” parameter might seem a bit counter intuitive here, but understand that the flow direction is with regard to the underlying N-VDS and not the T1 downlink interface (LIF). A quick diagram hopefully explains it:

The capture ouput clearly shows that the ICMP packets arrive at the vdrPort so that seems fine:

Reference point 4 – vdrPort input
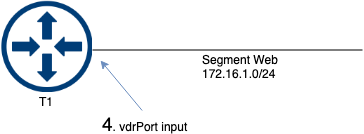
How about after the DLR kernel module has spent some quality time with the packets?
It’s as simple as changing “output” to “input” in the nsxcli command:
nsxcli -c start capture interface vdrPort direction input expression dstip 172.16.1.53

The ICMP packets got routed to the Segment Web. If you look closely you’ll note that the source MAC address has changed. So everything is working as expected here.
Summary
In this part we captured traffic at four different reference points on the NSX-T data path. We followed virtual machine traffic from when it just left the guest OS all the way to where it got routed by the Tier-1 Gateway onto the next NSX-T segment.
In the next part we will continue our journey on the NSX-T data path as the packets hit the physical network. Stay tuned!

Leave a comment