I have been spending some time exploring the VCF 9.1 distributed connection model and how NSX integrates with the external EVPN side of the model. Rather than starting with a physical leaf/spine environment, I wanted a small and disposable lab where I could focus on the control plane first.
For that purpose, I used containerlab with FRR to represent the external EVPN side. The goal was to bring up BGP EVPN peering with the VCF/NSX Route Controller, observe the control-plane exchange from the FRR side, and get a better feel for the configuration steps involved.
This post walks through the basic setup, including the Linux/containerlab side, the FRR configuration, and the corresponding NSX configuration needed to get the lab running.
Lab Topology
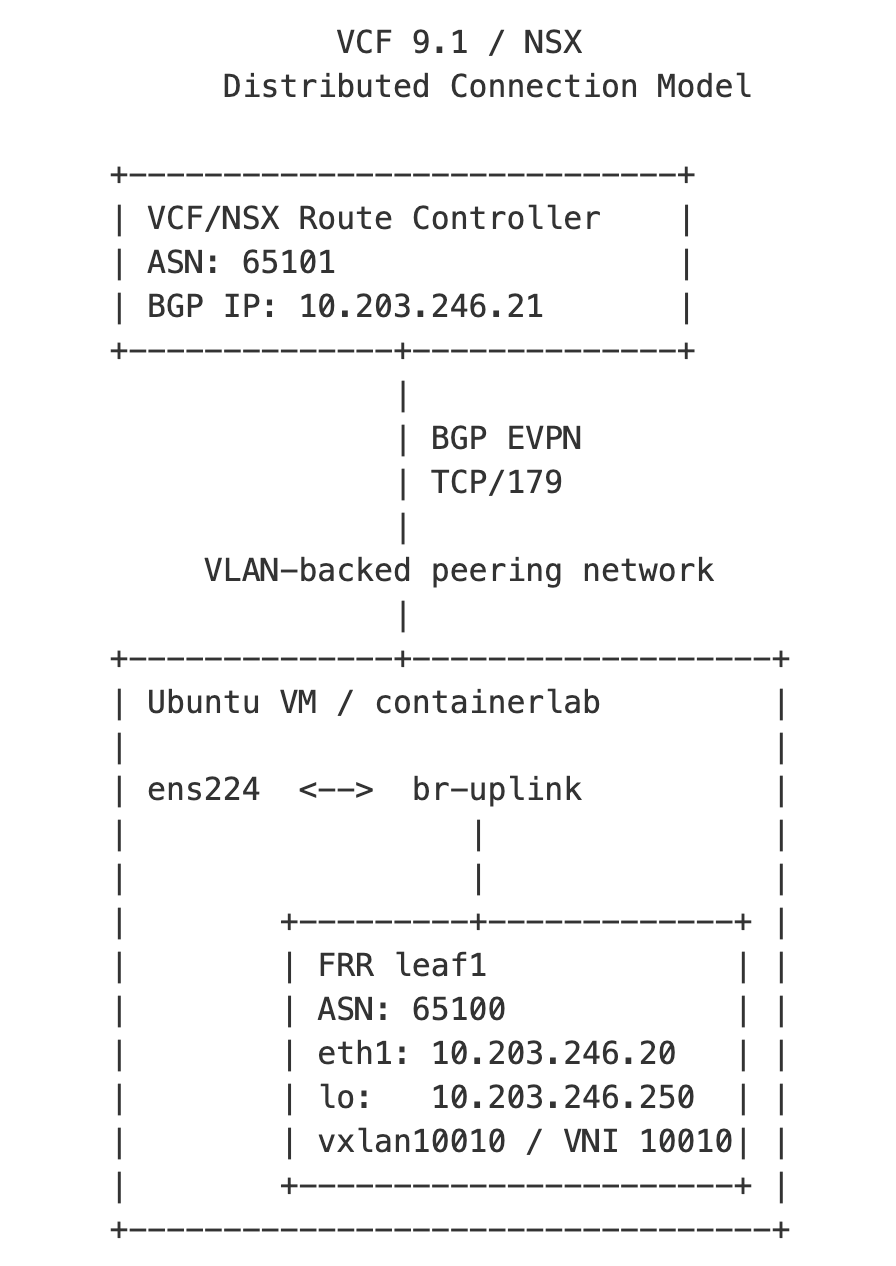
The lab consists of an Ubuntu VM running Docker and containerlab. Inside containerlab, an FRR container acts as a software-based EVPN/VXLAN leaf on the external side of the lab. The FRR container is connected toward the VCF/NSX environment through a Linux bridge, which in turn is connected to a dedicated VLAN-backed interface on the Ubuntu VM.
The purpose of the lab was to test the distributed connection model using BGP EVPN over VXLAN. In this model, the focus is not centralized Tier-0 routing, but the EVPN control-plane interaction between the VCF/NSX Route Controller and the external EVPN/VXLAN leaf.
The Ubuntu VM has two network interfaces:
| Interface | Purpose | IP Address |
|---|---|---|
ens192 | Management access to the Ubuntu VM | 10.203.240.81/24 |
ens224 | Lab uplink toward the EVPN/VXLAN peering network | No IP address |
The lab-facing interface, ens224, is attached to a Linux bridge named br-uplink. containerlab connects the FRR container to this bridge, allowing the FRR-based EVPN/VXLAN leaf and the VCF/NSX Route Controller peer interface to communicate on the same external VLAN.
                    VCF 9.1 / NSX
              Distributed Connection Model

        +-----------------------------+
        | VCF/NSX Route Controller    |
        | ASN: 65101                  |
        | BGP IP: 10.203.246.21       |
        +--------------+--------------+
                       |
                       | BGP EVPN
                       | TCP/179
                       |
             VLAN-backed peering network
                       |
        +--------------+-------------------+
        | Ubuntu VM / containerlab         |
        |                                  |
        | ens224  <-->  br-uplink          |
        |                  |               |
        |                  |               |
        |        +---------+-------------+ |
        |        | FRR leaf1             | |
        |        | ASN: 65100            | |
        |        | eth1: 10.203.246.20   | |
        |        | lo:   10.203.246.250  | |
        |        | vxlan10010 / VNI 10010| |
        |        +-----------------------+ |
        +----------------------------------+
The addressing used in this lab was:
| Component | IP Address |
|---|---|
| Ubuntu VM management interface | 10.203.240.81/24 |
| FRR EVPN/VXLAN leaf | 10.203.246.20/24 |
| VCF/NSX Route Controller peer | 10.203.246.21/24 |
| FRR loopback / router ID / VTEP address | 10.203.246.250/32 |
Prepare the Linux VM
The containerlab part of the setup runs on a small Ubuntu VM. The VM only needs Docker, containerlab, and a dedicated network interface that can be used as the lab uplink toward the VCF/NSX environment.
First, update the package index and install Docker:
sudo apt updatesudo apt install -y docker.iosudo systemctl enable --now docker
Install containerlab:
bash -c "$(curl -sL https://get.containerlab.dev)"
Optionally add your user to the docker group so Docker commands can be run without sudo:
sudo usermod -aG docker $USERnewgrp docker
Validate that both Docker and containerlab are working:
docker versioncontainerlab version
At this point the Linux VM is ready to host the FRR-based EVPN/VXLAN leaf. The next step is to prepare the external bridge that connects containerlab to the VLAN-backed interface used for BGP EVPN peering with the VCF/NSX Route Controller.
Create the External Bridge
The lab-facing interface on the Ubuntu VM is used to connect the containerlab fabric to the external VLAN used for BGP EVPN peering with the VCF/NSX Route Controller.
In my lab, this interface was ens224. The interface itself does not need an IP address on the Ubuntu host. Instead, it is attached to a Linux bridge, and containerlab connects the FRR container to that bridge.
First, bring up the lab-facing interface:
sudo ip link set ens224 up
Create the Linux bridge:
sudo ip link add br-uplink type bridgesudo ip link set br-uplink up
Attach the physical VM interface to the bridge:
sudo ip link set ens224 master br-uplink
You can verify the bridge configuration with:
ip link show br-uplinkbridge link
The expected result is that ens224 is listed as a member of br-uplink.
These commands create the bridge for the running system. If the VM is rebooted, the bridge configuration must either be recreated or made persistent using the network configuration method used by the Linux distribution.
Since the FRR container will use its own MAC address behind the Ubuntu VM NIC, the ESXi port group backing ens224 must allow this traffic. In my lab, the following security settings were required on the port group:
Promiscuous Mode: AcceptMAC Address Changes: AcceptForged Transmits: Accept
At this point, the Ubuntu VM has an external bridge that containerlab can connect to. The next step is to define the containerlab topology and attach the FRR container to br-uplink.
Define the containerlab Topology
With the external bridge in place, the next step is to define a small containerlab topology. For this lab, I used a single FRR container to represent a software-based EVPN/VXLAN leaf on the external side.
Create a working directory for the lab:
mkdir nsx-evpn-labcd nsx-evpn-lab
Create a directory for the FRR configuration:
mkdir -p leaf1
Create the containerlab topology file:
nano clab.yml
Example clab.yml:
name: nsx-evpn-labtopology: nodes: leaf1: kind: linux image: frrouting/frr:latest binds: - ./leaf1/daemons:/etc/frr/daemons - ./leaf1/frr.conf:/etc/frr/frr.conf - ./leaf1/vtysh.conf:/etc/frr/vtysh.conf exec: - ip addr add 10.203.246.20/24 dev eth1 - ip link set eth1 up - ip addr add 10.203.246.250/32 dev lo - ip link set lo up - ip route replace default via 10.203.246.1 - ip link add br10 type bridge - ip link set br10 up - ip link add vxlan10010 type vxlan id 10010 local 10.203.246.250 dstport 4789 nolearning - ip link set vxlan10010 master br10 - ip link set vxlan10010 up links: - endpoints: ["leaf1:eth1", "br-uplink"]
In this topology, leaf1 is the FRR container. Its eth1 interface is connected directly to the Linux bridge br-uplink, which provides connectivity to the external VLAN used for BGP EVPN peering with the VCF/NSX Route Controller.
The containerlab exec section also creates a local Linux bridge, br10, and a VXLAN interface, vxlan10010, inside the FRR container. The VXLAN interface uses VNI 10010 and the FRR loopback address 10.203.246.250 as the local VTEP address.
The FRR configuration itself is mounted into the container using bind mounts. This makes it easy to edit the FRR configuration from the Ubuntu host and redeploy the lab when needed.
Configure FRR
The FRR container needs two configuration files: one to enable the required FRR daemons, and one for the actual routing configuration.
Start with the daemons file:
nano leaf1/daemons
Example leaf1/daemons:
zebra=yesbgpd=yesospfd=noospf6d=noripd=noripngd=noisisd=nopimd=noldpd=nonhrpd=noeigrpd=nobabeld=nosharpd=nostaticd=yespbrd=nobfdd=nofabricd=novrrpd=nopathd=no
Create the vtysh.conf file:
nano leaf1/vtysh.conf
Example leaf1/vtysh.conf:
service integrated-vtysh-config
Next, create the FRR configuration:
nano leaf1/frr.conf
Example leaf1/frr.conf:
frr defaults traditionalhostname leaf1service integrated-vtysh-configlog stdout informational!router bgp 65100 bgp router-id 10.203.246.250 no bgp default ipv4-unicast no bgp ebgp-requires-policy neighbor 10.203.246.21 remote-as 65101 neighbor 10.203.246.21 update-source eth1 ! address-family ipv4 unicast neighbor 10.203.246.21 activate network 10.203.246.250/32 exit-address-family ! address-family l2vpn evpn neighbor 10.203.246.21 activate advertise-all-vni exit-address-family!line vty
In this example, the FRR leaf uses ASN 65100 and peers with the VCF/NSX Route Controller at 10.203.246.21 using ASN 65101.
The loopback address 10.203.246.250/32 is used as the FRR router ID and VTEP-related identity in the lab. The l2vpn evpn address family is enabled for the BGP neighbor so that EVPN routes can be exchanged with the VCF/NSX Route Controller.
Deploy the containerlab topology:
sudo containerlab deploy -t clab.yml
After deployment, enter the FRR container:
docker exec -it clab-nsx-evpn-lab-leaf1 vtysh
Useful verification commands inside FRR:
show bgp summaryshow bgp l2vpn evpn summaryshow bgp l2vpn evpnshow running-config
Configure the VCF/NSX Side
With the FRR-based EVPN/VXLAN leaf prepared in containerlab, the next step is to configure the VCF/NSX side of the distributed connection model.
In this lab, the important NSX component is the Route Controller. The Route Controller provides the BGP EVPN control-plane connectivity between the NSX fabric and the external EVPN/VXLAN leaf.
At a high level, the NSX-side configuration consists of:
- Create a Route Controller.
- Configure the Route Controller BGP interface.
- Configure the BGP EVPN peer toward the external EVPN/VXLAN leaf.
- Create a Distributed VXLAN Connection.
- Select the Route Controller for the Distributed VXLAN Connection.
- Configure the EVPN L3 VNI, Route Distinguisher, and Route Targets.
- Attach the Distributed VXLAN Connection to a Transit Gateway.
The relevant peer information used in this lab was:
| Component | Value |
|---|---|
| FRR leaf peer IP | 10.203.246.20 |
| FRR ASN | 65100 |
| VCF/NSX Route Controller BGP source IP | 10.203.246.21 |
| VCF/NSX ASN | 65101 |
The Route Controller BGP interface must have connectivity to the same VLAN-backed peering network as the FRR container interface. In this lab, that VLAN was exposed to the Ubuntu VM through ens224 and bridged into containerlab using br-uplink.
Create the Route Controller
In NSX Manager, create the Route Controller from:
Networking > EVPN > Route Controller
During the Route Controller workflow, configure:
- Route Controller name
- Form factor
- Route Controller node placement
- Management interface
- BGP interface
- BGP floating IP
- Local AS
- BGP EVPN peer information
For a lab, a small form factor and a single Route Controller node may be sufficient. For production environments, follow the VCF design guidance for Route Controller sizing and availability.
The BGP EVPN peer configuration points to the external EVPN peer. In this lab, that was the FRR container:
Local AS: 65101BGP source IP: 10.203.246.21Remote peer IP: 10.203.246.20Remote AS: 65100
Create the Distributed VXLAN Connection
After the Route Controller has been created, create a Distributed VXLAN Connection from:
Networking > VPC Connectivity > External Connections
Select:
Type: Distributed VXLAN Connection
The Distributed VXLAN Connection is where the EVPN/VXLAN mapping is defined. Configure the relevant values, including:
- Route Controller
- EVPN L3 VNI
- Route Distinguisher
- Import Route Target
- Export Route Target
The Route Controller selected here is the Route Controller that peers with the external EVPN side.
Attach the Connection to a Transit Gateway
Finally, attach the Distributed VXLAN Connection to a Transit Gateway from the relevant project context:
Networking > VPC Connectivity > Transit Gateways
Create or select a Transit Gateway using a Distributed VXLAN Connection and attach the Distributed VXLAN external connection created earlier.
At this point, the VCF/NSX side should attempt to establish BGP EVPN peering with the FRR container. The peering state and exchanged routes can then be validated from both NSX and FRR.
Verify the Peering
After the VCF/NSX Route Controller and the FRR container have been configured, the first thing to verify is basic BGP reachability.
From the Ubuntu VM, enter the FRR container:
docker exec -it clab-nsx-evpn-lab-leaf1 vtysh
Check the BGP session:
show bgp summary
You should see the VCF/NSX Route Controller peer in an established state:
Neighbor V AS MsgRcvd MsgSent TblVer InQ OutQ Up/Down State/PfxRcd10.203.246.21 4 65101 ... ... ... 0 0 ... ...
Next, check the EVPN address family:
show bgp l2vpn evpn summary
This should show the EVPN session toward the Route Controller as established.
To inspect the EVPN routes received or advertised by FRR, use:
show bgp l2vpn evpn
Depending on what has been configured on the VCF/NSX side, you should start seeing EVPN route information related to the distributed VXLAN connection.
It can also be useful to verify the FRR running configuration:
show running-config
Exit from vtysh and verify the Linux interfaces created inside the FRR container:
docker exec -it clab-nsx-evpn-lab-leaf1 ip -br adocker exec -it clab-nsx-evpn-lab-leaf1 ip -d link show vxlan10010docker exec -it clab-nsx-evpn-lab-leaf1 bridge link
The ip -d link show vxlan10010 command verifies that the VXLAN interface exists and shows the VNI, local VTEP address, destination port, and other VXLAN-specific parameters.
On the Ubuntu host, basic connectivity and packet capture can help when troubleshooting:
ip addr showip link show br-uplinkbridge link
To check whether BGP traffic is passing over the bridge:
sudo tcpdump -i br-uplink -nn port 179
Or directly on the lab-facing interface:
sudo tcpdump -i ens224 -nn port 179
If the BGP session does not establish, start with the basics:
docker exec -it clab-nsx-evpn-lab-leaf1 ping 10.203.246.21
If ping fails, the issue is likely with VLAN connectivity, the Linux bridge, the ESXi port group security settings, or the Route Controller BGP interface placement.
If ping works but BGP does not establish, check:
- Local and remote ASN values
- BGP source and peer IP addresses
- EVPN address family activation
- Firewall rules between the FRR container and the Route Controller
- Whether the Route Controller BGP interface is on the expected VLAN-backed network
If the BGP session establishes but EVPN route exchange does not look correct, also verify:
- The VXLAN interface exists inside the FRR container
- The expected VNI is configured on the VXLAN interface
- The VXLAN interface is attached to the local Linux bridge
- The FRR loopback address is present and matches the local VTEP address
- The EVPN/VXLAN values on the VCF/NSX side match the intended lab design
The first milestone is a stable BGP EVPN session between the FRR-based EVPN/VXLAN leaf and the VCF/NSX Route Controller. Once that is working, route exchange can be validated from both sides.
Closing Thoughts
This was a small lab, but it gave me what I wanted: a quick way to test the VCF 9.1 distributed connection model without needing access to a physical EVPN fabric.
Using containerlab and FRR, I could represent the external EVPN/VXLAN side, establish BGP EVPN peering with the VCF/NSX Route Controller, and observe the exchanged routes from the FRR side. It also helped me get more familiar with the configuration flow around Route Controller, Distributed VXLAN Connection, and Transit Gateway.
This does not replace proper validation against a real fabric, but for learning the moving parts and making the control plane visible, it was a useful exercise.

Leave a comment