One of those scenarios where the NSX platform really shines is in multi-site environments. Here NSX together with vSphere is the infrastructure that delivers on business requirements like workload mobility, resource pooling, and consistent security.
Since NSX version 6.2 we can roll out NSX in a vSphere environment managed by more than one vCenter system. This type of deployment is called cross-vCenter NSX.
With cross-vCenter NSX we are able to centrally deploy and manage networking and security constructs regardless of the management domain architecture.
In preparation for some assignments involving cross-vCenter NSX, I’ve been busy with a cross-vCenter NSX lab. I thought I’d do a little writeup in two three parts on setting this up.
In this first post we’ll prepare the management and control plane for cross-vCenter NSX. In part 2 we’ll have a closer look at how to deploy the data plane in a cross-vCenter NSX environment.
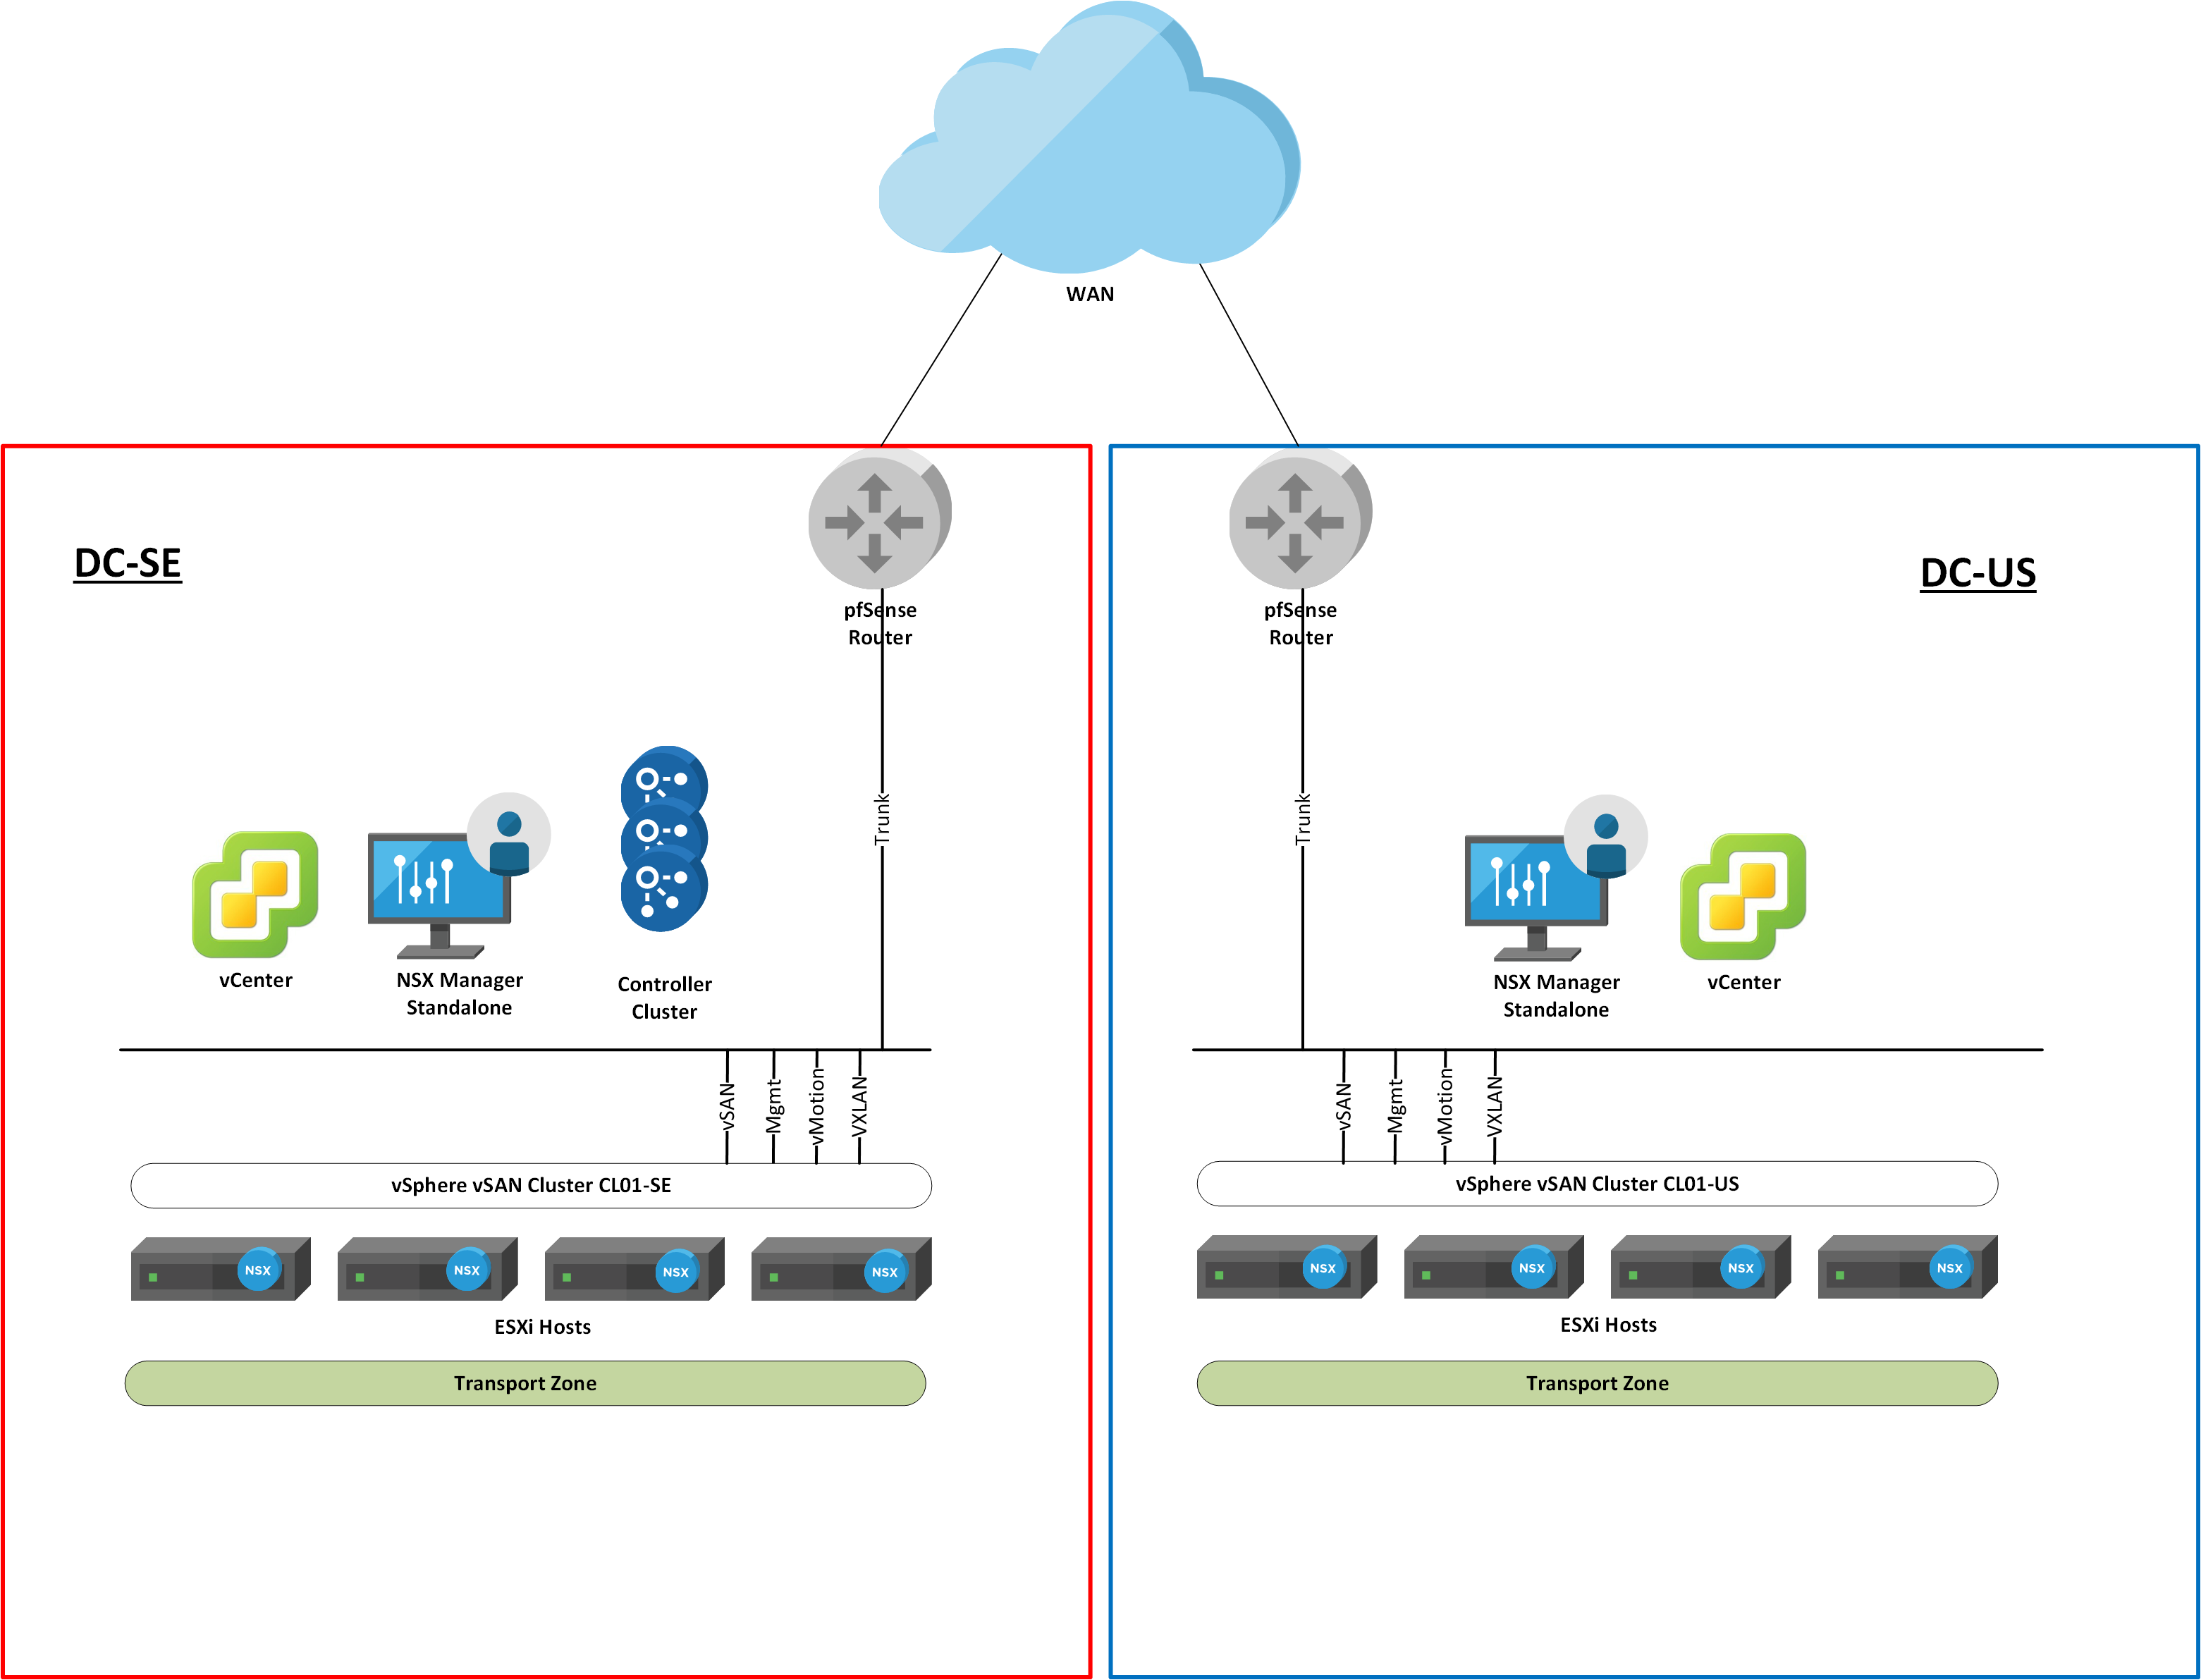
The lab environment
The following components are the building blocks I used for this simple cross-vCenter NSX lab:
- 8 x nested ESXi 6.7 U1 hosts
- 2 x vCenter 6.7 U1 systems
- vSAN storage
- NSX 6.4.4
- 2 x pfSense routers
Just so we spend time focusing on the relevant stuff I’ve done some preparation in advance.
I set up two fictional sites: DC-SE and DC-US. Each with its own, non-linked, vCenter server system, four ESXi hosts, vSAN storage, and a standalone NSX Manager.
The ESXi hosts are prepared for NSX (VIBs installed) and a segment ID pool and transport zone are configured. DC-SE is running a controller cluster.

Each site has a pfSense machine acting as the perimeter router. Static routing is set up so each site’s management, vMotion and VTEP subnets can reach each other. Both sites also have a VLAN for vSAN plus one for ESG uplink which will be used in part two.
| VLAN | DC-SE | DC-US |
| Management | 10.0.10.0/24 | 10.1.10.0/24 |
| vMotion | 10.0.20.0/24 | 10.1.20.0/24 |
| vSAN | 10.0.30.0/24 | 10.1.30.0/24 |
| VXLAN transport | 10.0.50.0/24 | 10.1.50.0/24 |
| Uplink | 10.0.70.0/24 | 10.1.70.0/24 |
Please keep in mind that this is a simple lab environment design and in no way a design for a production environment. Have a look at VMware Validated Designs if you want to learn more about SDDC designs including NSX for production environments.
Step 1 – Assign primary role to NSX Manager
There’s a 1:1 relationship between vCenter server and NSX Manager. This is true when setting up cross-vCenter NSX as well, but here the NSX managers involved are assigned roles.
The NSX manager that should be running the controller cluster is assigned the primary role. Additional NSX Managers participating in cross-vCenter NSX (up to 7) are assigned the secondary role.
So let’s start by assigning the NSX Manager in DC-SE the primary role. In vCenter, go to Networking and Security > Installation and Upgrade > Management > NSX Managers. Select the NSX Manager and click on Actions > Assign Primary Role.


As you can see the role has changed from Standalone to Primary.
When we assign the primary role to a NSX Manager, its controller cluster automatically becomes the universal controller cluster. It is the one and only controller cluster in cross-vCenter NSX and provides control plane functionality (MAC, ARP, VTEP tables) for both the primary and secondary NSX Managers.
Step 2 – Configure Logical Network settings
While we’re at DC-SE we continue with the configuration of the logical network settings for cross-vCenter NSX.
We begin with defining a Universal Segment ID pool. These segment IDs (VNIs) are assigned to universal logical switches. Universal logical switches are logical switches that are synced to the secondary NSX Managers. We will look more at this in part two.
Go to Networking and Security > Installation and Upgrade > Logical Network Settings > VXLAN Settings > Segment IDs and click Edit.

Configure a unique range for the universal segment ID pool.
Create a universal transport zone and add CL01-SE
Next to VXLAN Settings we find Transport Zones. Click it and click Add to start adding an Universal Transport Zone.

Give it a name like “UTZ” and switch Universal Synchronization to On and add the CL01-SE vSphere cluster to the transport zone.
Step 3 – Assign secondary role to NSX Manager
Assigning the secondary role to the NSX Manager located in DC-US is done from the primary NSX Manager in DC-SE.
In vCenter, navigate to Networking and Security > Installation and Upgrade > Management > NSX Managers. Select the NSX Manager and click on Actions > Add Secondary Manager.

Here you enter the information of the NSX Manager at DC-US and click Add.
The NSX Manager at DC-US now has the secondary role. We can verify this by logging in to vCenter at DC-US and navigate to Networking and Security > Installation and Upgrade > Management > NSX Managers.

As you can see the NSX Manager now has the Secondary role.
Add CL01-US to the universal transport zone
While still logged in to vCenter at DC-US navigate to Networking and Security > Installation and Upgrade > Logical Network Settings > Transport Zones. The transport zone that we created over at the primary NSX Manager in DC-SE, shows up here too. Mark the transport zone and click on the “Connect Clusters” button. Add the CL01-US cluster to the transport zone.

Wrapping up
This completes the preparation of the management and control plane for our simple cross-vCenter NSX lab.
We started by assigning the primary role to the NSX Manager at DC-SE. By doing so we got ourselves a universal controller cluster. Next we configured the logical network settings necessary for cross-vCenter NSX. Finally we paired primary NSX Manager at DC-SE with the standalone NSX Manager at DC-US by assigning it the secondary role. Along the way we also added the vSphere clusters on both sites to the same universal transport zone.
In part 2 we will set up the data plane in our cross-vCenter NSX lab. We’ll have a look at how logical switching, distributed logical routing, and distributed security works in a cross-vCenter NSX environment.

Leave a comment