
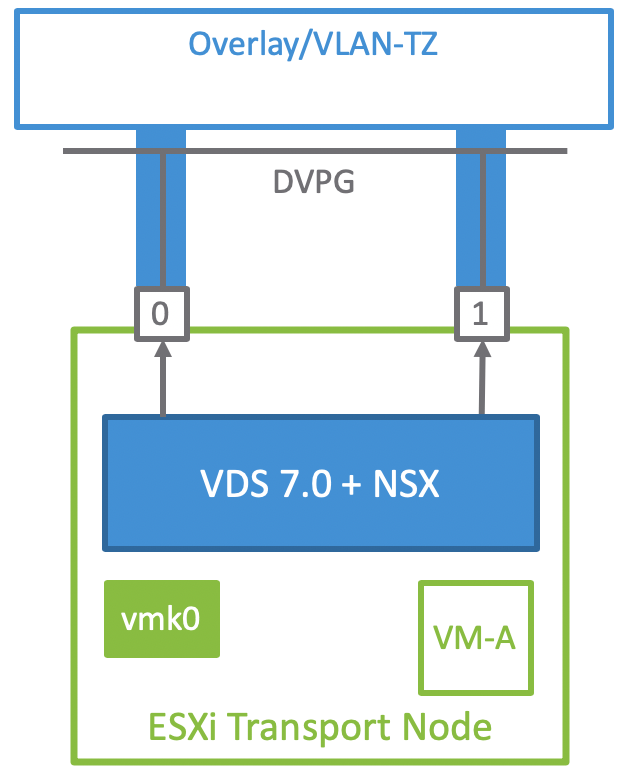
With the release of vSphere 7 comes the vSphere Distributed Switch 7.0. This latest version comes with support for NSX-T Distributed Port Groups. Now, for the first time ever it is possible to use a single vSphere Distributed Switch for both NSX-T 3.0 and vSphere 7 networking!
First and foremost, this new integration enables a much simpler and less disruptive NSX-T installation in vSphere environments. Previously, installing NSX-T required setting up a pNIC consuming N-VDS. Not seldom ESXi hosts found themselves handing over all of their networking, including vSphere system networking, to NSX-T. With the introduction of the VDS 7.0 this is a thing of the past.
vSphere admins will appreciate the additional control, VDS 7.0 being a 100% vCenter construct, and for pure micro-segmentation projects in a VLAN-only vSphere environment using this new integration will be a no-brainer.

Another “problem” that the VDS 7.0 solves, is that the NSX-T segments it backs are presented as ordinary distributed port groups. This should eliminate any issues surrounding NSX-T segments not being discoverable by third party applications. Yes, opaque networks have been around since 2011, but fact is that not all third party applications have picked up on these.
One inevitable consequence of tying the two platforms together on a VDS is the new dependency. vCenter is required for running NSX-T on ESXi. It’s not a huge thing, but something to keep in mind when architecting a solution.
This article wouldn’t be complete without some hands-on. I’m going to have a look at what’s involved in configuring vSphere and NSX-T so that a single VDS 7.0 is used for both vSphere 7 and NSX-T 3.0 networking. I’ll configure this in a greenfield scenario and a brownfield scenario.
Let’s get started!
Greenfield scenario
We’ve just deployed vSphere 7 and NSX-T 3.0. ESXi hosts have not been configured as transport nodes yet. On a high level there are just two steps necessary to set up the integration:
- Install and configure VDS 7.0
- Prepare NSX-T
Let’s have a closer look at each of these steps.
Step 1 – Install and configure VDS 7.0
Installing VDS 7.0 sounds like an extensive process. In reality this is simply you creating a new vSphere Distributed Switch and making sure version 7.0.0 (default) is selected:

As you can see “NSX Distributed Port Group” is listed as the main new feature for distributed switch 7.0.
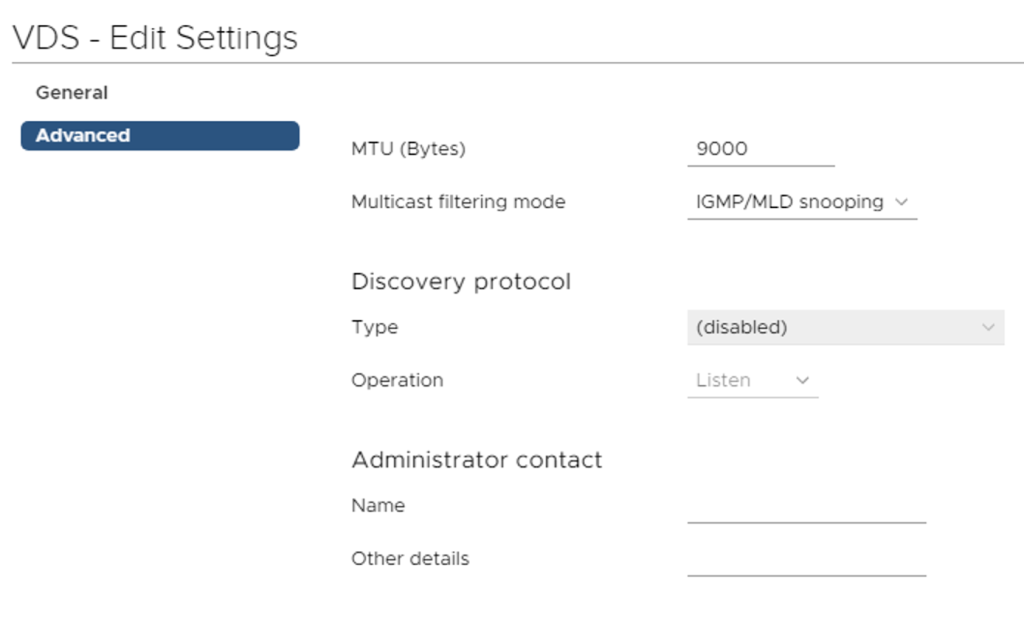
This VDS will potentially have to deal with Geneve encapsulated packets (NSX-T overlay networking) so we are required to increase the MTU to at least 1600. I’m going for 9000 right away:
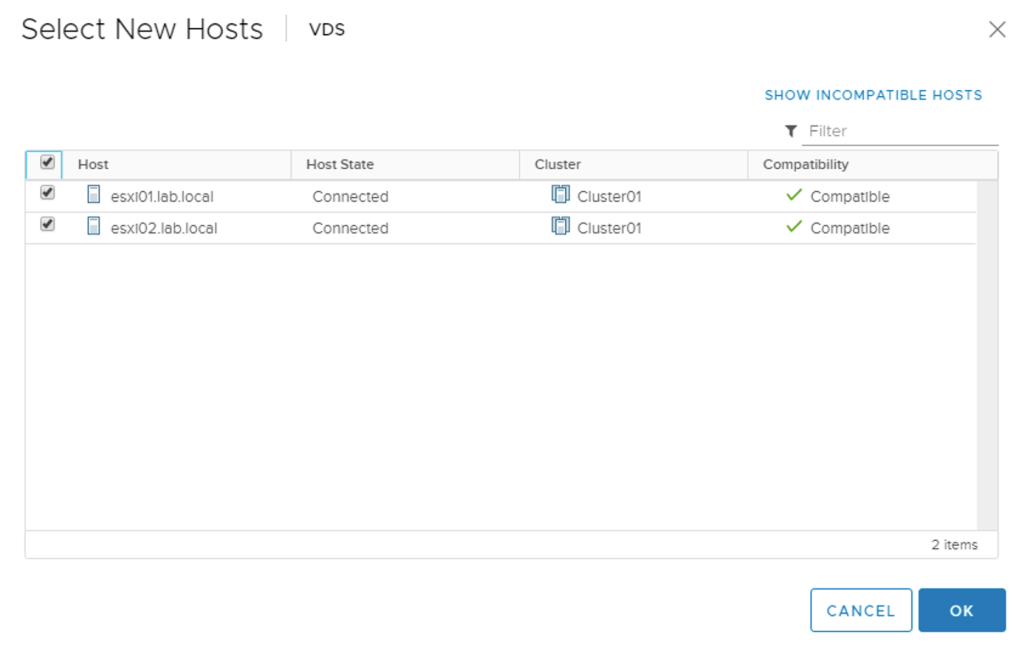
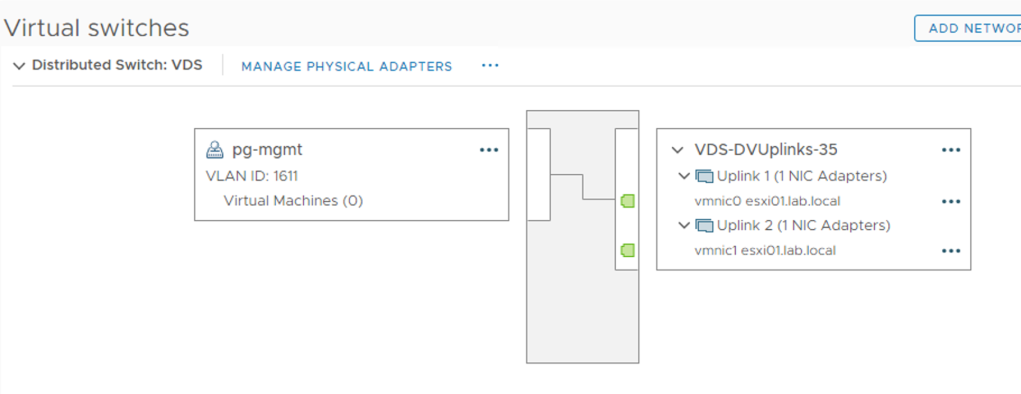
We create our distributed port groups for management, vMotion, storage, and possibly VM networking and then add our hosts to the new VDS. Here pNICS are assigned to the VDS uplinks:

We migrate the VMkernel adapters to their respective DVPGs and can remove the standard switch. We’re done in vSphere.
Step 2 – Prepare NSX-T
On the NSX-T side we start with creating a Transport Node Profile. Besides an N-VDS we can now select a VDS as the Node Switch type which is exactly what we want:

When choosing a VDS we need to pick a vCenter instance and a VDS 7.0. Please note that the vCenter instance needs to be added as a Compute Manager to NSX-T before it can be selected here.
Further down on the same form we map the uplinks as defined in the NSX-T Uplink Profile to the uplinks of the VDS:

The final step is to prepare the ESXi hosts by attaching the new Transport Node Profile to the vSphere cluster:

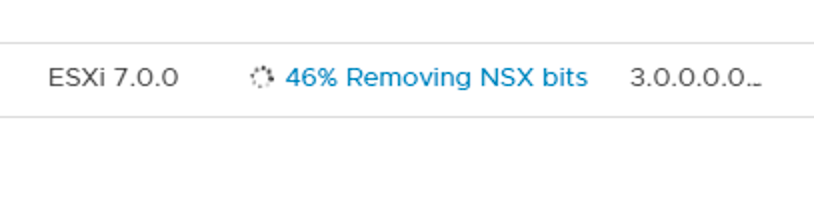
This will install the NSX-T bits as well as apply the configuration on the ESXi hosts:

A closer look at the VDS 7.0
In vCenter, if we look really carefully we can see that this VDS is now in use by NSX-T (too):

It’s a bit hard to spot, but the VDS is now of the type NSX Switch. This is mostly a cosmetic difference. From the vSphere perspective an NSX Switch is still just an ordinary VDS 7.0.
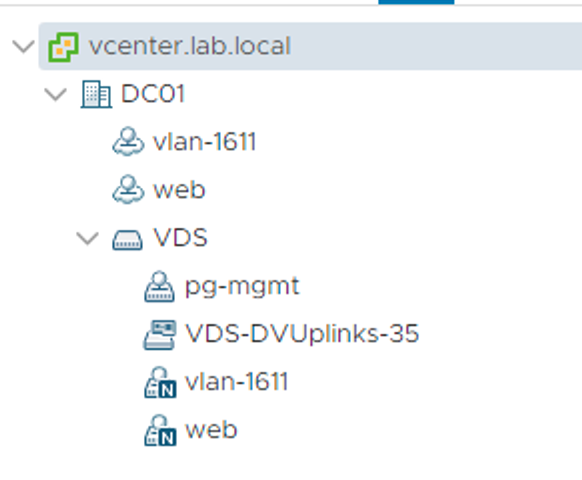
NSX-T segments that are backed by the VDS now show up as NSX distributed port groups:

Some NSX-T specific information like VNI, segment ID, and transport zone is visible from here which could come in handy one day.
Under Ports we can find some more NSX-T information like Port ID, VIF ID, and Segment Port ID which are coming straight from NSX-T:

When selecting an NSX distributed port group, the Actions menu contains a shortcut to the NSX Manager UI:
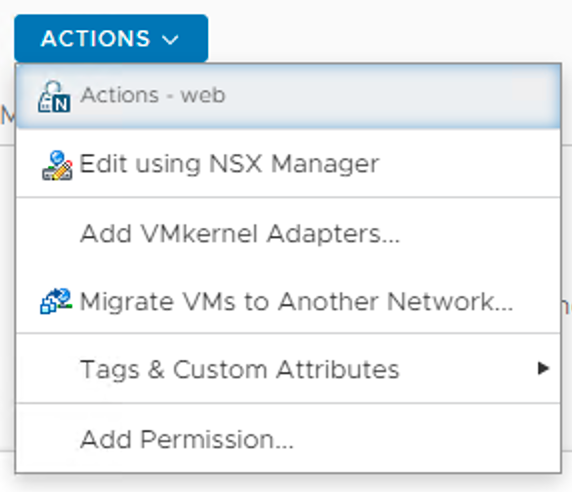
No editing in vCenter. The NSX distributed port groups are NSX-T objects (segments) and are managed through the NSX-T management plane.
Brownfield scenario
We just upgraded our environment to vSphere 7 and NSX-T 3.0. The ESXi hosts were previously configured as NSX-T transport nodes and both of their pNICS belong to the N-VDS. The configuration process in this scenario involves the following high level steps:
- Create a new vSphere cluster
- Install and configure VDS 7.0
- Create new NSX-T Transport Node Profile
- Configure mappings for uninstall
- Move ESXi host to the new cluster
- Attach a Transport Node Profile to the new cluster
- vMotion virtual machines
- Repeat steps 5 + 7 for the remaining ESXi hosts
Migrating NSX-T to VDS 7.0 involves many more steps and also some data plane disruption. Let’s see how it’s done.
Step 1 – Create new vSphere cluster
Quite a first step, but to minimize data plane disruptions, a new vSphere cluster is created. This cluster will be configured with the VDS-based Transport Node Profile in a later step:
UPDATE (17/04/2020) – When creating the new vSphere cluster, make sure that the “Manage all hosts in the cluster with a single image” is not selected. This feature is currently incompatible with NSX-T 3.0. Thank you Erik Bussink for pointing this out in the comments.

The existing and the new cluster next to each other as seen in vSphere Client:

Step 2 – Install and configure VDS 7.0
Like in the greenfield scenario we create a new version 7.0 vSphere Distributed Switch:
And set the MTU to at least 1600 bytes:
Next, we add the ESXi hosts to the new VDS, but without migrating any pNICS or VMkernel adapters. At this point the ESXi hosts just need to know that the new VDS exists:
We create distributed port groups for the VMkernel adapters that are currently on the N-VDS. These need to be created in advance to ensure a smooth migration of VMkernel adapters later:

One important detail here is that these “VMkernel” distributed port groups need to be configured with a Port binding set to Ephemeral:

Step 3 – Create new NSX-T Transport Node Profile
Now we create a new Transport Node Profile that is configured with a VDS type Node Switch. Select the vCenter instance and the VDS 7.0:
We configure the Teaming Policy Switch Mapping that maps uplinks defined in the uplink profile to the uplinks of the VDS 7.0:
Step 4 – Configure mappings for uninstall
A new feature in NSX-T 3.0 is that when moving an ESXi host out of a vSphere cluster that has a Transport Node Profile attached, NSX-T is automatically uninstalled from that host.
The uninstall process needs to know what to do with the ESXi host’s pNICS and VMkernel adapters. This information is configured under Network Mappings for Uninstall on the Transport Node Profile that is attached to the host’s current vSphere cluster:

Under VMKNic Mappings we map the current VMkernel adapters to the distributed port groups that we created as part of step 2:

Similarly, under Physical NIC Mappings we add the pNICS that should be handed over to the VDS:

Step 5 – Move ESXi host to the new vSphere cluster
We put the ESXi host in maintenance mode so that it can be moved to the new vSphere cluster:

Once moved, the NSX bits and configuration are automatically removed from the ESXi host:
Thanks to the uninstall mappings configured at step 4, the ESXi host’s pNICs and VMkernel adapters are migrated to the VDS:
Step 6 – Attach Transport Node Profile
With compute resources available in the new vSphere cluster, we can attach the new Transport Node Profile to the vSphere cluster:

NSX bits and configuration are once again installed on the ESXi host:

When the NSX installation is done our new VDS 7.0 is being presented as an NSX switch. This so we know it is used by NSX-T:

During the migration process the same NSX-T segments will be shown twice in vCenter:
Once as opaque networks available to VMs in the source vSphere cluster, and once as NSX distributed port groups available to VMs in the target vSphere cluster.
Step 7 – vMotion virtual machines
The NSX distributed port groups are the destination networks when VMs are being vMotioned to the new vSphere cluster:

vMotion seems to be smart enough to understand that the source opaque network and the destination NSX distributed port group are the same.

Step 8 – Repeat step 5 + 7
Now we simply repeat step 5 and 7 for the remaining ESXi hosts and virtual machines until the source vSphere cluster is empty and can be deleted:

Mission completed! 🙂
Summary
While setting up vSphere and NSX-T for the VDS 7.0 in a greenfield scenario is a simple and straight forward process, doing the same in a brownfield/migration scenario requires significantly more work. There’s room for some improvement here which most likely will be addressed in a future release.
All-in-all there is little doubt that this new NSX-T – vSphere integration is good news for customers running or planning to run NSX-T in a vSphere environment.
Thanks for reading.

Thanks for the the great article…
I was going through the situation where we have a platform where we use NSX-V for the management cluster and would like to upgrade to vSphere 7. Document talks about the Migration Assistant using NSX-T 3 to connect to the same Virtual Center as a compute manager to move the configuration, edge, host etc however i was wondering which type of migration does it support (Mainteance, Automated ) and while migrating to NSX-T we dont have VDS 7 due to the lower version of vsphere (6.7U3) . So we need to go with N-VDS for everything rather VDS ? Let me know if you have any suggestions
LikeLike
Hi and thank you for reading my blog.
You are correct. In your scenario you will end up with an N-VDS because you are on vSphere version lower than 7. As soon as you are on NSX-T 3.0 you can upgrade vSphere to version 7 and migrate to the VDS 7.0.
LikeLiked by 1 person
Great post of this new feature under the hood.
One question about using vds 7 that you mention in the post. For microsegmentation only projects, where no overlay is used at all, is it still necessary to mover to vlan backed segments or next on vds 7 can do de microsegmentation in standard vds7 port groups?
LikeLike
Hi and thanks for reading my blog.
You have to migrate virtual machines to NSX Distributed Port Groups (NSX-T segments) for micro segmentation even in a VLAN-only scenario.
LikeLike
Hello Rutger, thanks for that article !
As VMware encourage greenfield deployment with VDS 7.0 as N-VDS will be deprecated later, do you know if VDS 7.0 would come in vSphere Standard edition (for brownfield with N-VDS already in place)
How can a vSphere Standard environment could migrate to VDS with NSX-T ?
Or does NSX-T 3.0 bring the license/capability to deliver VDS 7.0 to vSphere ? I don’t think so (it is not the case with NSX-T 2.5 as opposed to NSX-V which brings VDS).
LikeLike
Hi and thanks for reading my blog.
Unfortunately I’m not able to answer this question. Reach out to your sales representative to find out what’s possible in your situation.
LikeLike
NSX does include the VDS entitlement.
LikeLike
Rutger,in your brownfield section you might want to add a warning in section Create new vSphere cluster. DO NOT select “manage all hosts in the cluster with a single image”. That activates the vSphere LifeCycle Manager which is incompatible with deploying NSX-T 3.0 to that cluster and will cause error “NSX cannot enabled on host(s) as vLCM is enabled on the cluster in vSphere system”
LikeLike
Thank you Erik. I updated the article with this information.
LikeLike
Hi Rutger, great article. Can you provide pore detail on the Transport Zones, Is overlay and VLAn needed for vDS v7 what should the switch entry be etc.
Thanks
LikeLike
Thanks Neil.
You are correct. VDS 7.0 does not change anything on the NSX-T side of things. You still need to create transport zones (VLAN and/or overlay) just as you would normally need with N-VDS backed segments.
LikeLike
Hi
Great article, do have nsx-t 3.0 reference design guide?
Thanks
Ba
LikeLike
It’s not available yet. Keep an eye on this thread: https://communities.vmware.com/docs/DOC-37591
LikeLike
Hi Rutger, great blog! thanks for your work.
Using VDS 7, MTU on uplink profile should be the default (1600)? If I set it to 9000 like I did with N-VDS I get an error of unsupported MTU when I try to create the transport node profile..Thanks!
LikeLike
Hi Rutger, great blog! thanks for your work.
Using VDS 7, MTU on uplink profile should be the default (1600)? If I set it to 9000 like I did with N-VDS I get an error of unsupported MTU when I try to create the transport node profile..Thanks!
LikeLike
Thanks. Yes that’s correct the MTU should be the default (1600) as this is now controlled by the VDS.
LikeLike
many thanks Rutger!
LikeLike
Hi Rutger,
Thanks for the valuable information on N-VDS to VDS 7.0 conversion.
I have an environment with vsphere 6.7 and NSX-T 3.0 with N-VDS.Can we convert N-VDS to VDS 6.7? or it is only applicable on 7.0?
Thanks
LikeLike
Hi Manoj and thank you.
You will need to upgrade vSphere to version 7 in order to make use of VDS 7.
Best regards,
Rutger
LikeLike
Hi Rutger,
great article – thanks for that!
Do you have some information, how to configure the uplinks (in NSX-T) when using LACP for the vDS?
(Do I only use the LAG as uplink1? Or do I have to use LAG as uplink1 and uplink2?)
Thanks in advance,
Marc
LikeLike
Hi Marc,
Thank you.
You would configure an uplink profile with only one uplink and connect that uplink to the lag1 of the VDS.
LikeLike
I have been trying to figure this out for a VDS using LACP and configuring NSX-T to use VDS instead of n-VDS. Using 1 uplink for lag1 doesn’t seem to work. It will not allow an uplink profile with only one uplink
LikeLike
Hi Matt!
If you use vDS for your host networking and not NVDS than you need to configure LAG within vCenter and not in NSX Manager. Once you have done that create an uplink profile with no LAG defined and failover order for default with like lag01. Later when you setup your transport node profile and select the VDS for networking you will see the LAG you defined in vCenter.
LikeLike
Have you encountered the problem where you can’t put an Edge Appliance on an NSX-enabled vDS because the hypervisor won’t communicate between Host and Edge TEPs? VMware acknowledges that this won’t work but is hesitant to call it a bug.
LikeLike
Hi,
This is a known limitation I would say 😉 Using different VLANs for host and edge TEP is the current solution (I believe).
LikeLike
This limitation has been removed. TEP’s for hosts and Edge’s can now in fact be on the same VLAN/subnet.
LikeLike
True, but the Edge VMs will need to be connected to NSX-T segments.
LikeLike
Hello Sir,
Great article! One question here. Why do you add the VLAN transport zone to the transport node profile? Nothing consumes it and the segments attached to that TZ.
Cheers,
Peter
LikeLike
Thanks Peter
Why not? If you want to do micro-segmentation for workloads on VLANs those workloads need to be on VLAN-backed NSX-T segments hence you need a VLAN TZ.
Cheers
Rutger
LikeLike
That is right, if your example shows that. Otherwise even in a consolidated deployment, vDS brought the possibility to add ESXi host only to the overlay TZ as vmkernel,vsan, vmotion etc interfaces can use a vDS PG and don’t need to be on a VLAN segment in NSX-T and by this hosts added to the VLAN TZ.
Currently designing a 3.0 deployment and a little confused. Lot has changed in 3.0 and how vDS can be consumed.
LikeLike
Yes, but you would need 4 pNICs if you want to run N-VDS and VDS in parallel. This article’s goal isn’t to highlight a particular scenario or use case but a new feature introduced in NSX-T 3 on vSphere 7. To be honest, not that much has changed from the NSX-T perspective. The same principles still apply. Good luck with your design.
LikeLike
Thanks for the great article!
It’s partly hilarious and partly sad, that official VMware’s documentation is not even near to be so clear and intelligible.
LikeLike