

One of the first things to configure after deploying the NSX Manager nodes is backup. No NSX-T implementation should ever get configured let alone go live without a working backup (and restore) in place.
Let’s have a look at how to set this up.
Backup target
NSX-T uses SFTP (TCP port 22) to transfer backup files to a backup target running an SFTP server. A Linux machine fits quite nice for this purpose simply because the (nearly) builtin SSH service makes it very easy to set up.
In this article I’m using Ubuntu 18.04, but you can basically use any Linux distribution that you prefer. I won’t go through the Ubuntu OS installation steps in this article. In short, you perform a standard Ubuntu server installation and add/enable the OpenSSH server.
Configuration
Once the Ubuntu server is up and running we need to spend some minutes on configuring it as a proper NSX-T backup target.
We want to use a dedicated service account for the NSX-T backup and restore operations. This account shouldn’t be able to do more than log in via SFTP and write NSX-T backup files to a directory.
To achieve the SFTP restriction we install a package called Restricted SSH (rssh). On Ubuntu that package is installed the ordinary way:
sudo apt install rssh
We then need to make one change in /etc/rssh.conf:
sudo nano /etc/rssh.conf
Accounts using the rssh shell should be allowed to login via SFTP and SFTP only. So we need to uncomment allowsftp. Save the file when done.

Next we create the service account itself:
sudo useradd -s /usr/bin/rssh nsx-backup
The “-s” parameter specifies that the account will use rssh as its shell.
Set a (strong) password for the service account:
sudo passwd nsx-backup
To verify that the rssh restriction is working for the service account you can try to login with SSH:
ssh nsx-backup@backup.demo.local

As you can see SSH access is not allowed (restricted by rssh).
The last thing we need to configure is a directory where the NSX-T backups will be stored. I also modify the permissions so that the service account can write to the directory:
sudo mkdir /backup
sudo chmod -R 757 /backup
Now that all the necessary configuration on the backup target is in place we can tighten security by allowing only the NSX Manager nodes and maybe a jump host to access the server on port 22. For example:
sudo ufw allow from 10.2.129.12 to any port 22
sudo ufw allow from 10.2.129.13 to any port 22
sudo ufw allow from 10.2.129.14 to any port 22
sudo ufw allow from 10.2.129.15 to any port 22
sudo ufw enable
Alternatively (or additionally) you could use the NSX-T DFW to restrict access.
NSX-T backup configuration
The NSX-T backup can be configured in the NSX Manager UI or via the API. Let’s have a look at both.
Configuration using the UI
Log in to NSX Manager:

Navigate to System > Backup & Restore:
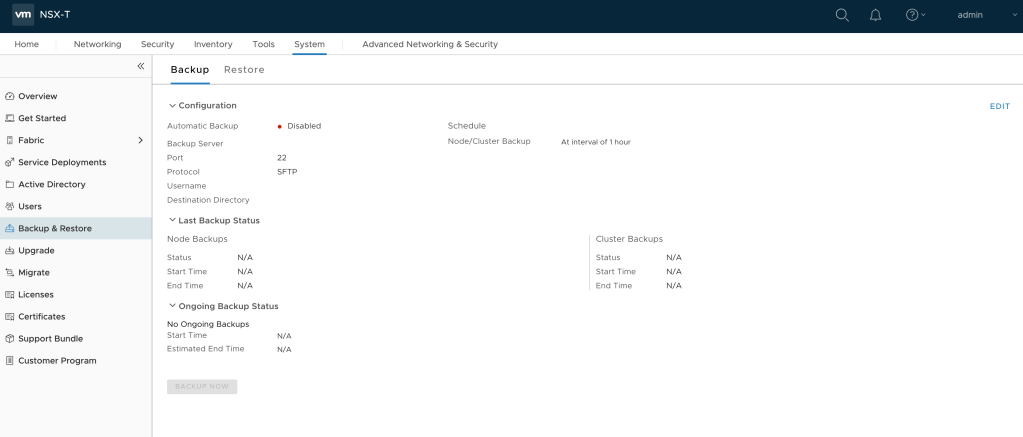
Click Edit in the upper right of the page and fill out the details for the backup target:

Click the Schedule tab:
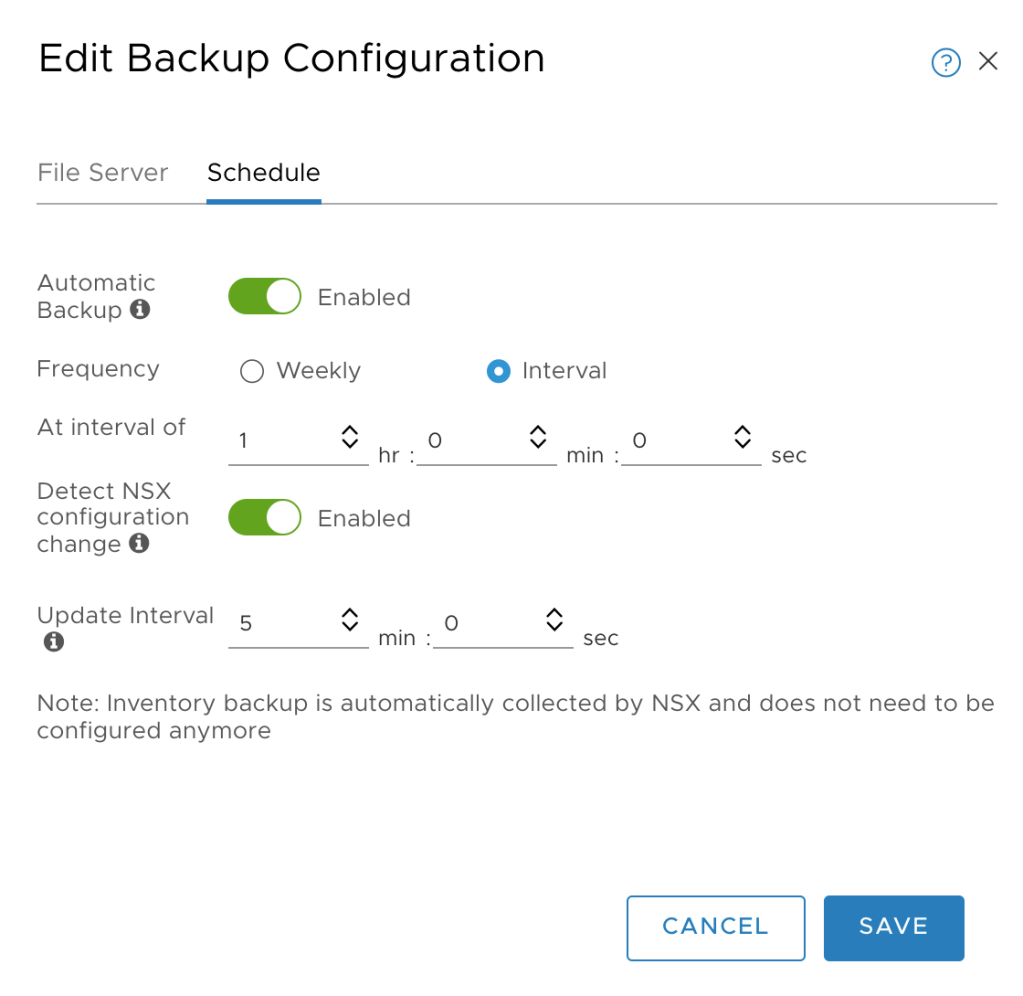
Enable Automatic Backup and adjust the interval according to your requirements. Optionally you can enable Detect NSX configuration change which triggers a full backup each time a configuration change is detected by NSX Manager.
After hitting the Save button a backup process is fired off immediately which gives us the opportunity to verify that everything is working. Hopefully node and cluster backups are successful:

While we’re here we should also configure the backup target details under the Restore tab so that this is in place when we need it:

After filling out the details of the backup target and hitting the Save button, the list with available backups is updated and available backups are shown:

Configuration via the API
The same configuration can be done via the NSX-T API.
SHA256 fingerprint
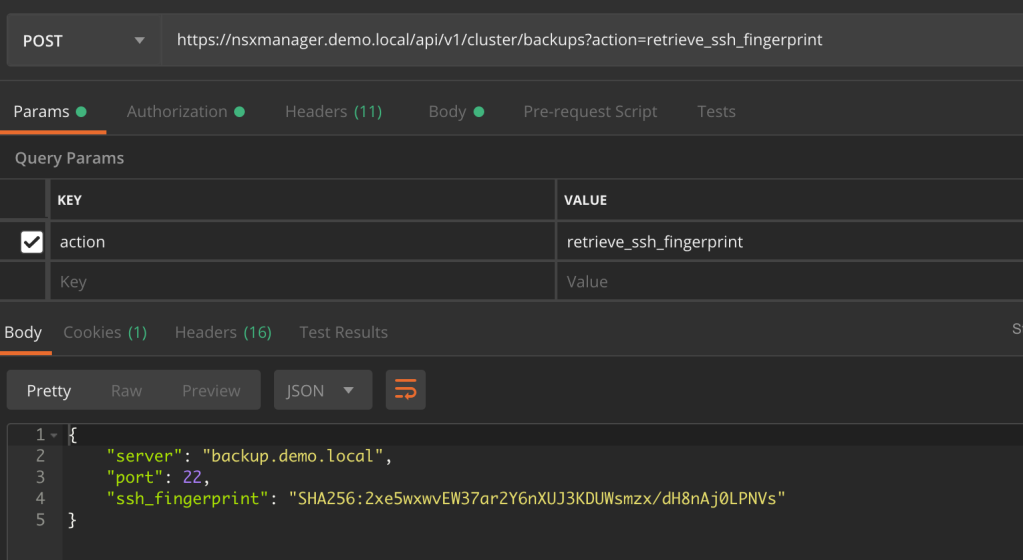
First we need to fetch the SHA256 fingerprint of the SFTP backup target. Use the following JSON code:
{
     "server":"backup.demo.local",
     "port":22
  }
Send this code as the body of a POST request to the API at:
https://nsxmanager.demo.local/api/v1/cluster/backups?action=retrieve_ssh_fingerprint
The NSX-T API responds with the SHA256 fingerprint of the SFTP server:
Backup configuration
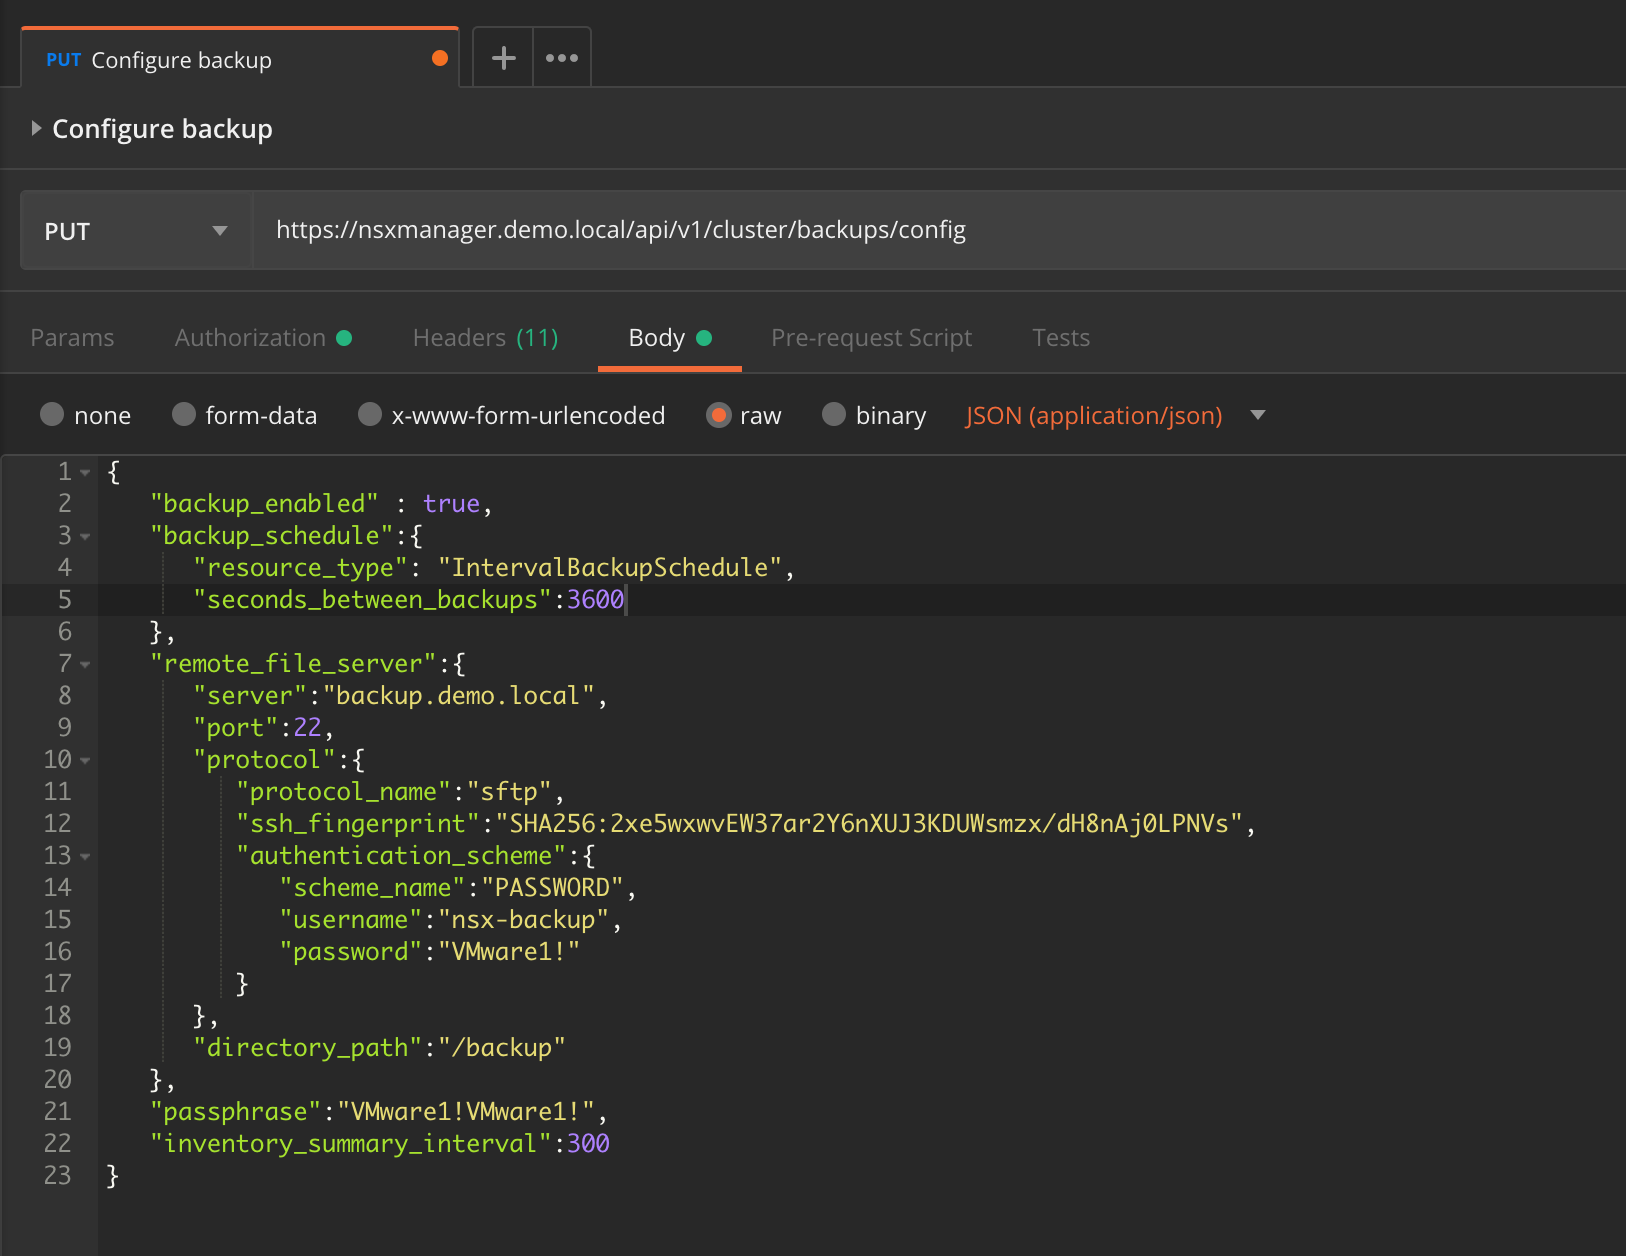
Specify the backup configuration in JSON. The JSON equivalent of the settings we used earlier in the UI looks like this:
{
    "backup_enabled" : true,
    "backup_schedule":{
       "resource_type": "IntervalBackupSchedule",
       "seconds_between_backups":3600
    },
    "remote_file_server":{
       "server":"backup.demo.local",
       "port":22,
       "protocol":{
          "protocol_name":"sftp",
          "ssh_fingerprint":"SHA256:2xe5wxwvEW37ar2Y6nXUJ3KDUWsmzx/dH8nAj0LPNVs",
          "authentication_scheme":{
             "scheme_name":"PASSWORD",
             "username":"nsx-backup",
             "password":"VMware1!"
          }
       },
       "directory_path":"/backup"
    },
    "passphrase":"VMware1!VMware1!",
    "inventory_summary_interval":300
 }
Send it as the body of a PUT request to the NSX-T API at:
https://nsxmanager.demo.local/api/v1/cluster/backups/config
Restore configuration
The restore settings in JSON format:
{
    "remote_file_server":{
       "server":"backup.demo.local",
       "port":22,
       "protocol":{
          "protocol_name":"sftp",
          "ssh_fingerprint":"SHA256:2xe5wxwvEW37ar2Y6nXUJ3KDUWsmzx/dH8nAj0LPNVs",
          "authentication_scheme":{
             "scheme_name":"PASSWORD",
             "username":"nsx-backup",
             "password":"VMware1!"
          }
       },
       "directory_path":"/backup"
    },
    "passphrase":"VMware1!VMware1!"
 }
Send this code as the body of a PUT request to the API at:
https://nsxmanager.demo.local/api/v1/cluster/restore/config

Listing the available backups
To retrieve a list of available backups you send a GET request to:
https://nsxmanager.demo.local/api/v1/cluster/restore/backuptimestamps

NSX-T follows the API-First approach and the entire platform including everything concerning backup and restore can be managed through the API. Check out the NSX-T API documentation for more details.
Retention
Unfortunately, there is no builtin backup retention in NSX-T like we have in the vCenter VAMI. What we have is a Python cleanup script that we can run on the backup target to clean up old backups.
30 days retention example
To set up a 30 day retention period for NSX-T backups follow these steps:
1 – Copy the Python script from an NSX Manager node to the backup server. Using SCP for example:
sudo scp root@nsxmanager.lab.local:/var/vmware/nsx/file-store/nsx_backup_cleaner.py /sbin/
2 – Create a wrapper shell script under /etc/cron.daily. This wrapper script runs the “nsx_backup_cleaner.py” with the desired parameters:
sudo nano /etc/cron.daily/nsx_backup_cleaner.sh
3 – Copy the following lines into the script:
#!/bin/sh
/sbin/nsx_backup_cleaner.py -d /backup -k 30
4 – Save the script and make it executable:
sudo chmod +x /etc/cron.daily/nsx_backup_cleaner.sh
The script will run once a day, iterate through the NSX-T backups and delete the ones that are older than 30 days.
Conclusion
A working NSX-T backup is a critical component of every NSX-T platform. Luckily setting this up is a straight forward process.
There is always room for improvement. Support for some more file transfer protocols and builtin retention management would be nice. We might see something happening around this in future releases of NSX-T.

Hi Rutger! Thanks for a great blog-post. Regarding the retention script, is this only present in the NSX-T version 2.4. Im on 2.3 and are unable to find this Python script under /var/vmware/nsx/file-store.
Would it be possible to publish the source code somewhere for us that have not upgraded to 2.4 just yet. 🙂
Best Regards // Mattias
LikeLike
Thanks Mattias!
I don’t believe I can make it publicly available, but I can probably share it with you. Just tell me where I can reach you and I will send it to you.
LikeLike
Hi Rutger, thanks for this post, very useful. Can you please help me understand the following in case if NSXT is configured with 3 Cluster Managers.
– Is it recommended to take a backup of all the 3 appliances?
– During restore do we need to restore all 3 cluster managers individually or NSXT will take care of all this?
Thanks,
Mohan
LikeLike
Hi and thank you for reading my blog.
The backup needs to be configured only once on the VIP of the management cluster for example.
You always restore the entire management cluster. You have the option to restore only one manager node, but that will leave you with just one manager node at that point.
Cheers
LikeLike
Many pre sales miss out backup of NSX-T requirement and when it comes to implementation then deployment team bring up to customer that need another Linux machine and cannot install third party backup client agent. This is one experience that I encounter to share.r
LikeLike
Hi Rutger:
Good article. Got me a little concerned about whether we are clearing our old backups and what happens if a backup fails. Another team is in charge of this so I am reaching out to them.
Going to be reading through your other articles.
Thanks,
Ed McGuigan.
LikeLike